Learn Advanced Image Generation: Transform Child Drawings to Avatars
Typically, we use simpler methods to generate AI images, such as basic text-to-image prompting.
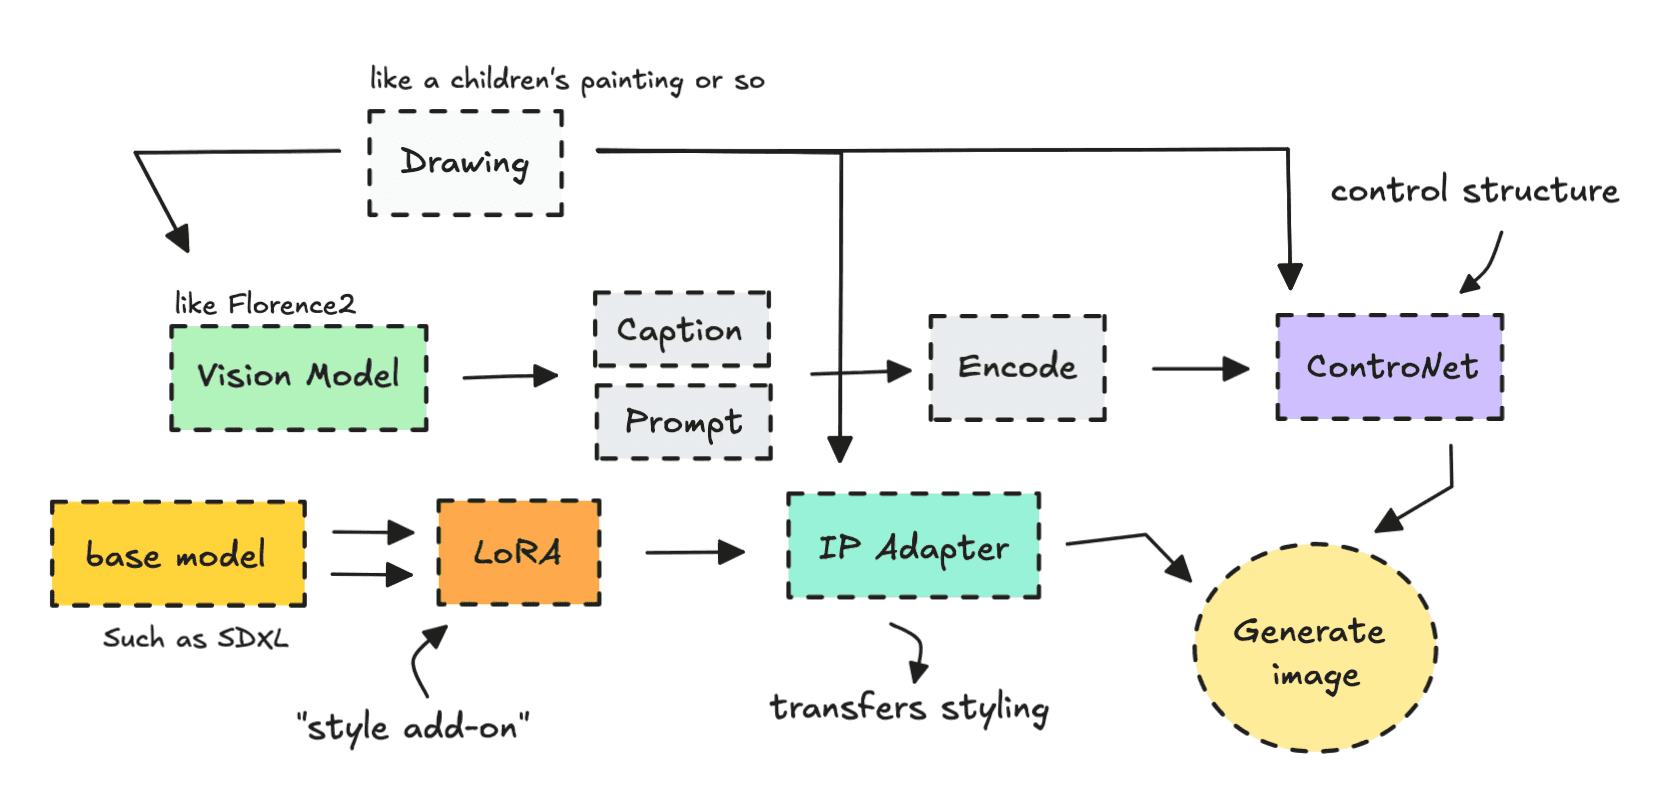
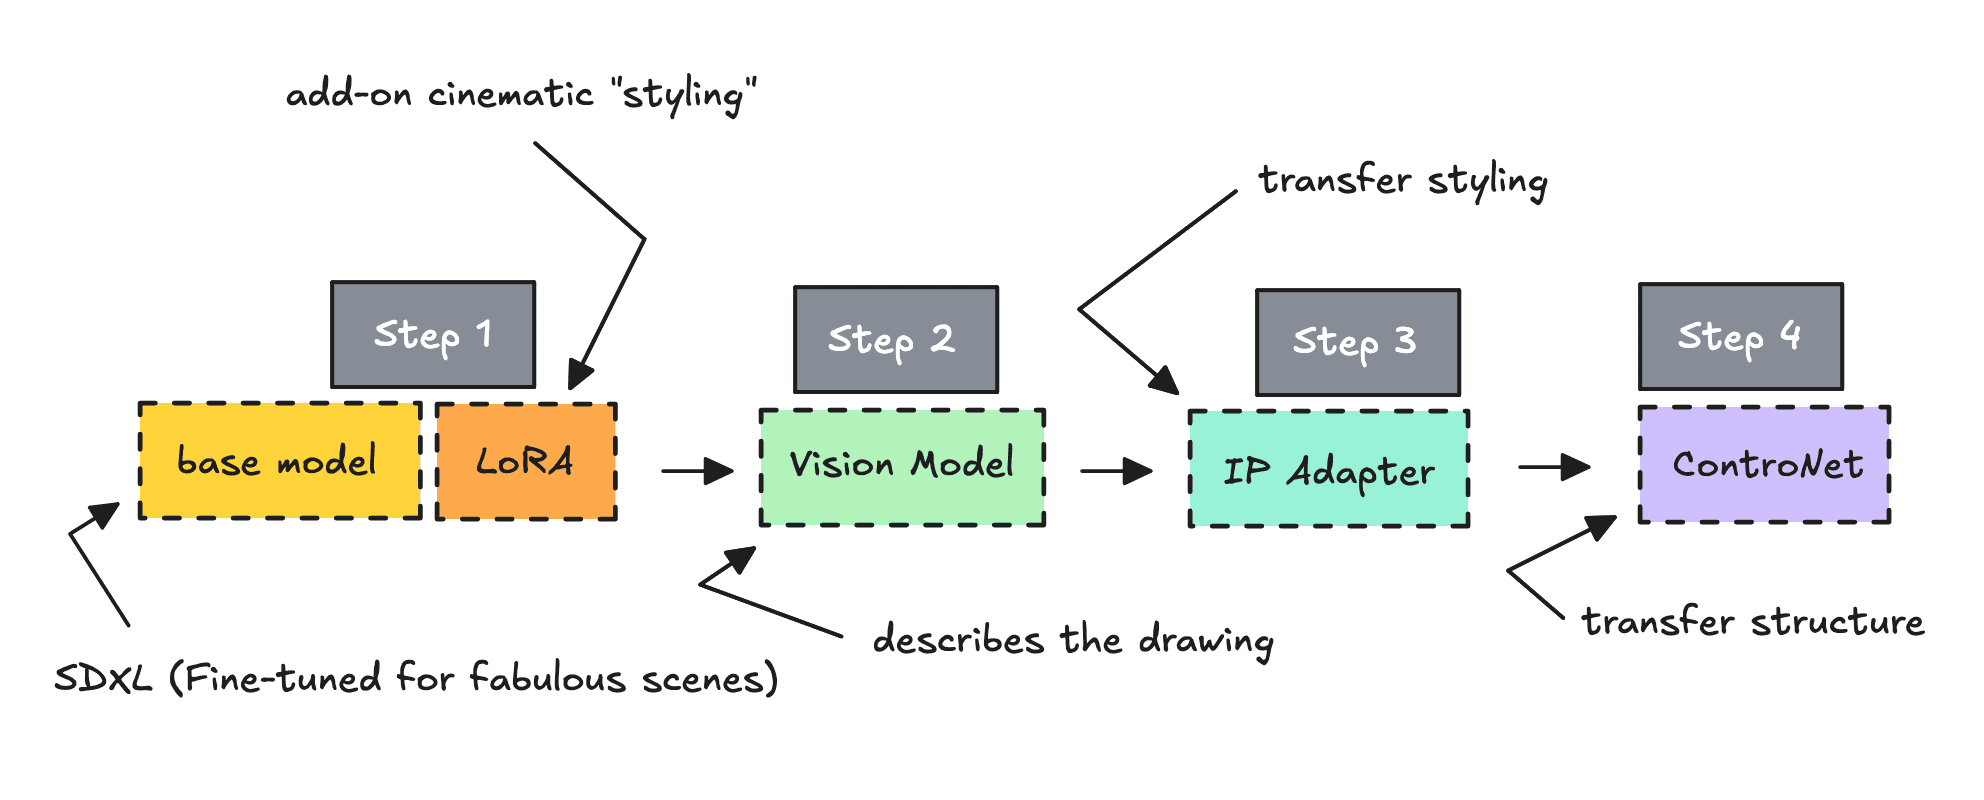
However, by combining technologies like Diffusion models, LoRAs, IP Adapters, ControlNets, and Vision models, we can control the image generation process so much better.
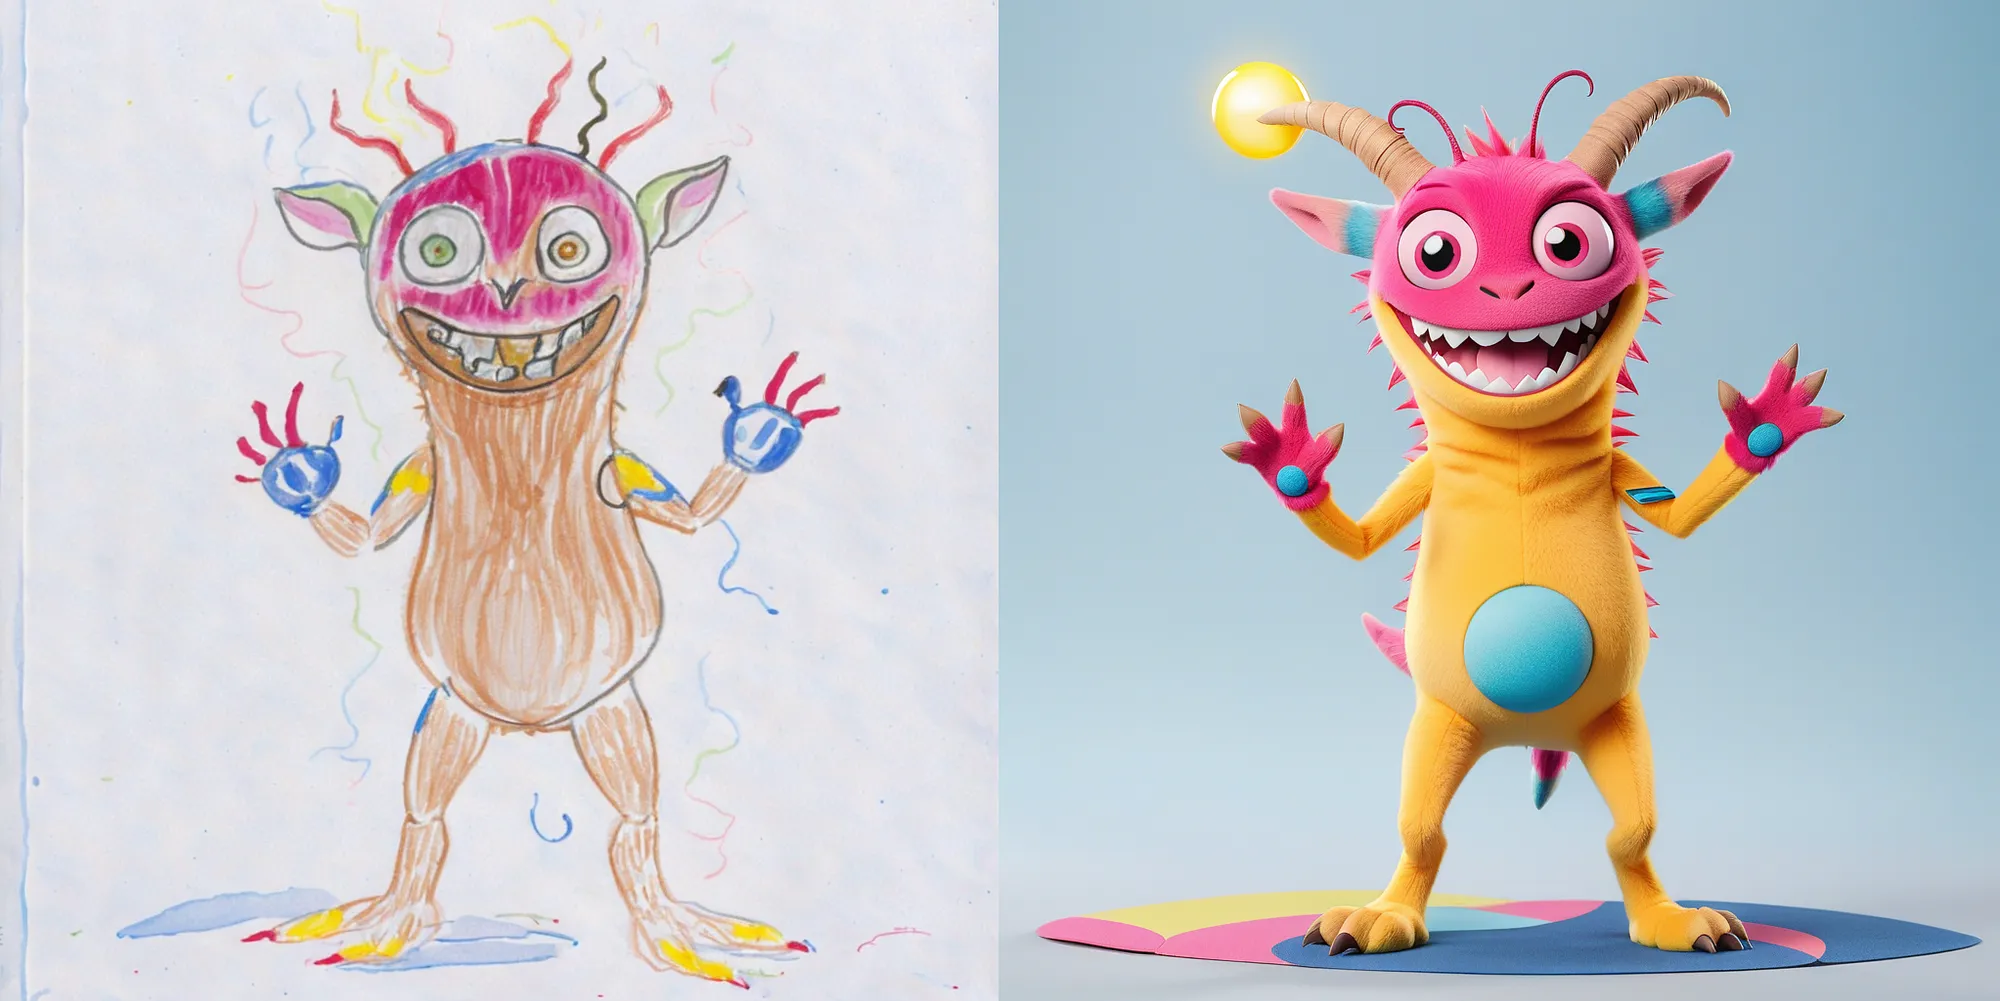
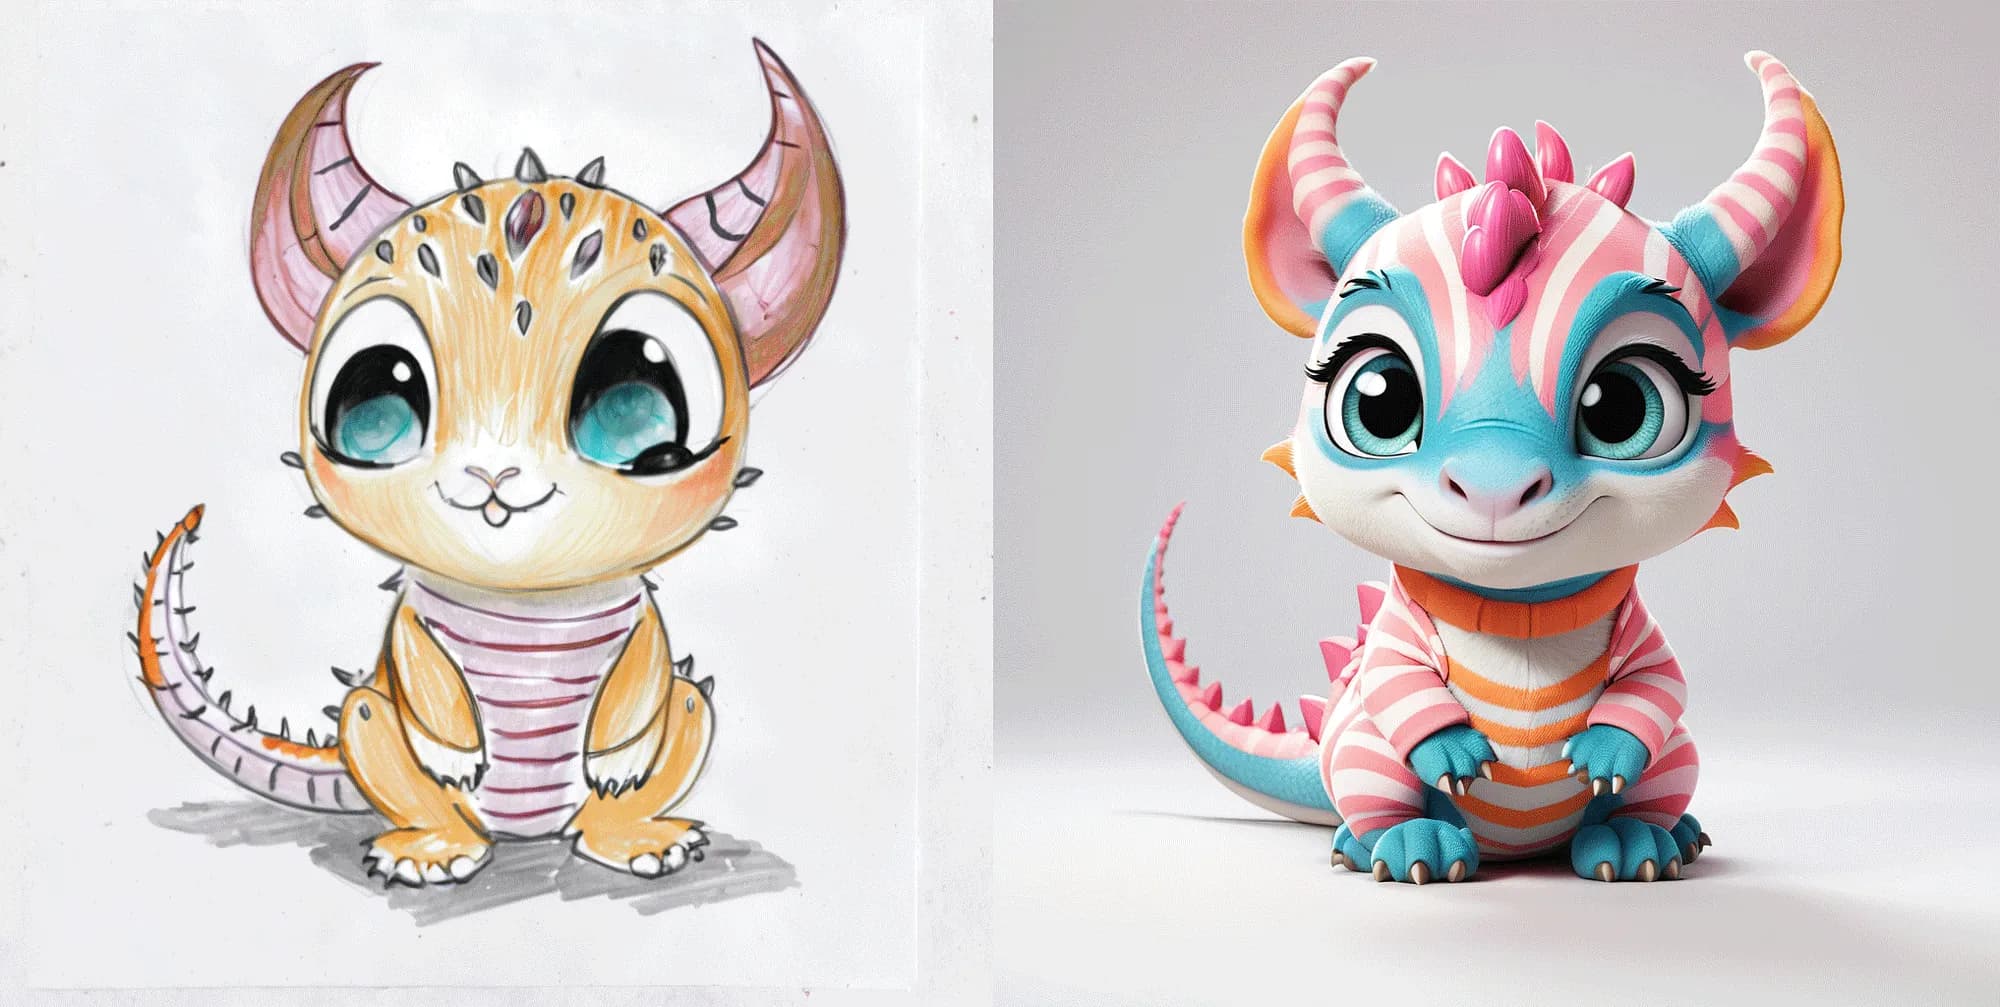
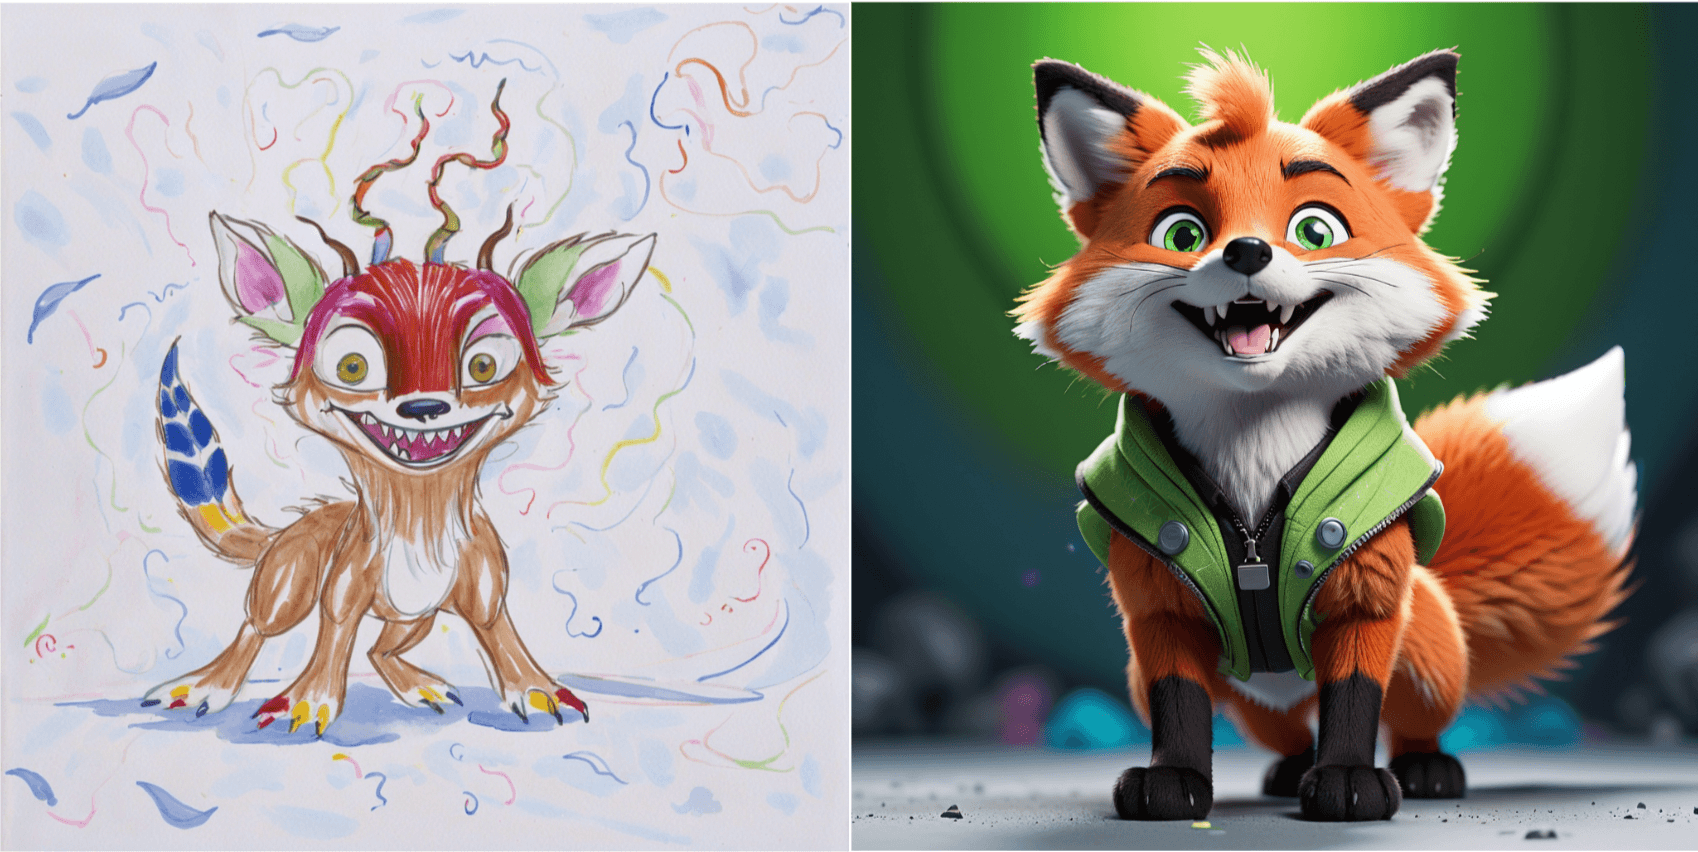
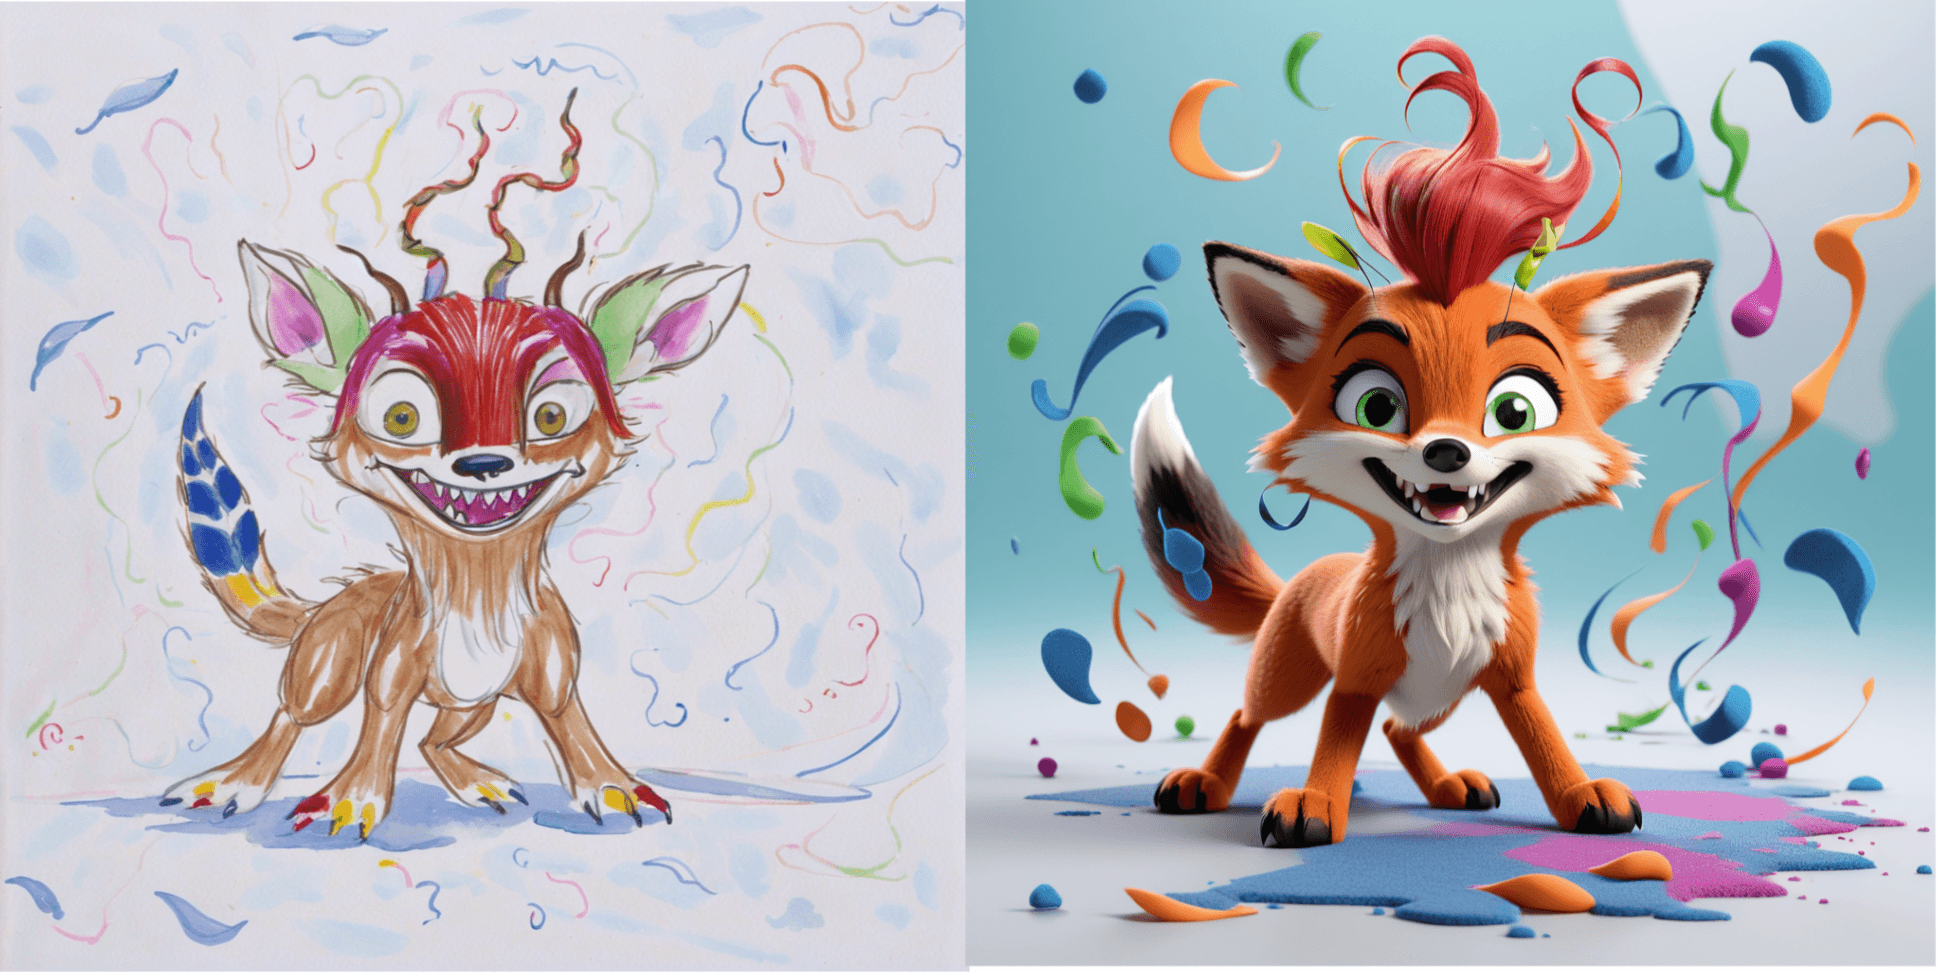
A great way to demonstrate how to transfer over edges and styles of an image, and combine it with LoRAs, is to build a workflow that turns drawings into digital avatars as seen below.
You’ve probably seen examples of this on social media where child drawings are transformed into AI images but the results are not always exact.
Usually what they do is to first convert an image into text, then using that text as a prompt to generate a new image (image-to-text-to-image).
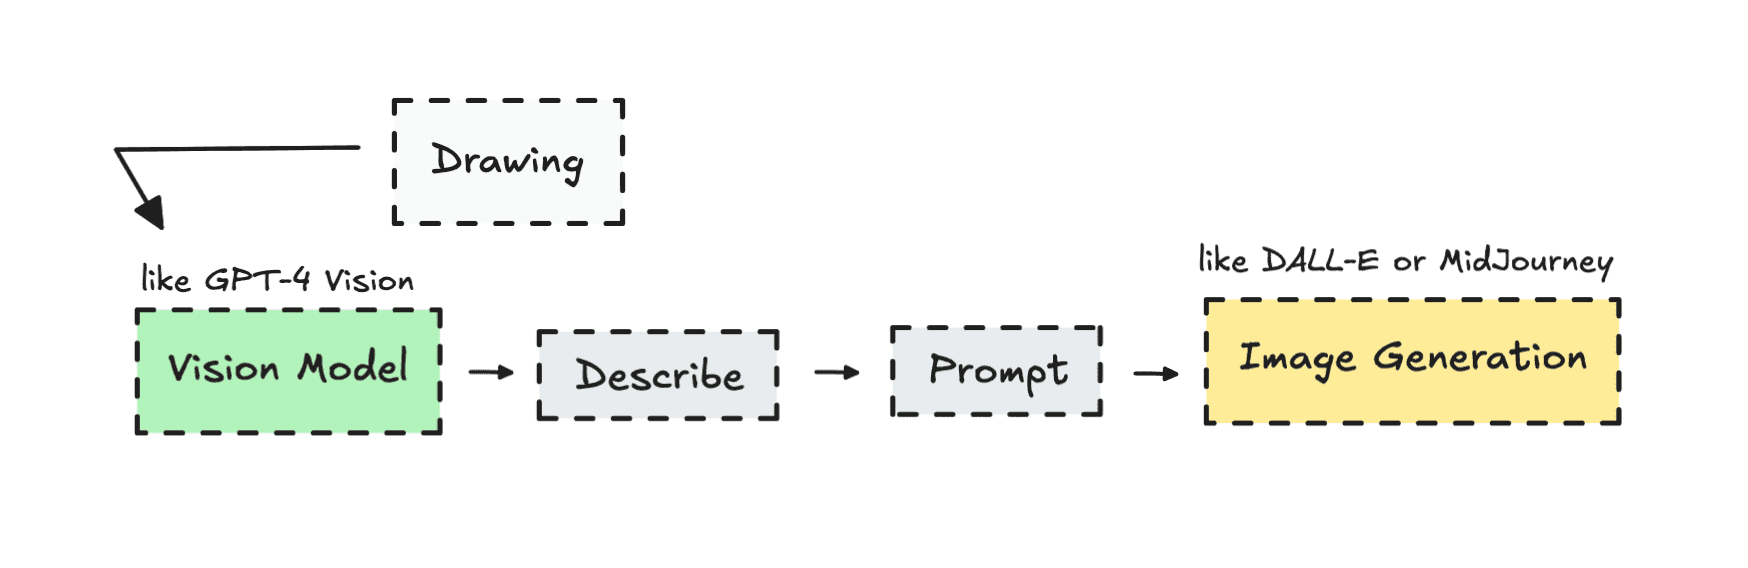
So to make sure we can control the output better, giving us amazing results, we can build a more advanced workflow, that closely align with the original sketch.
In this article, I’ll walk you through leveraging these technologies in one workflow that you can continue to build on. This will hopefully teach you have to use them for other projects as well.
If you’re still new to ComfyUI workflows or the advanced image space in general, I’d suggest reading this piece first — although you don’t have to.
Introduction
I’m probably more excited about this than the people I show it to, but honestly, by learning these technologies, we can build some pretty cool stuff.
The AI image-generation space keeps evolving, but not many people dive into building with it — as it seems more complicated than it really is.
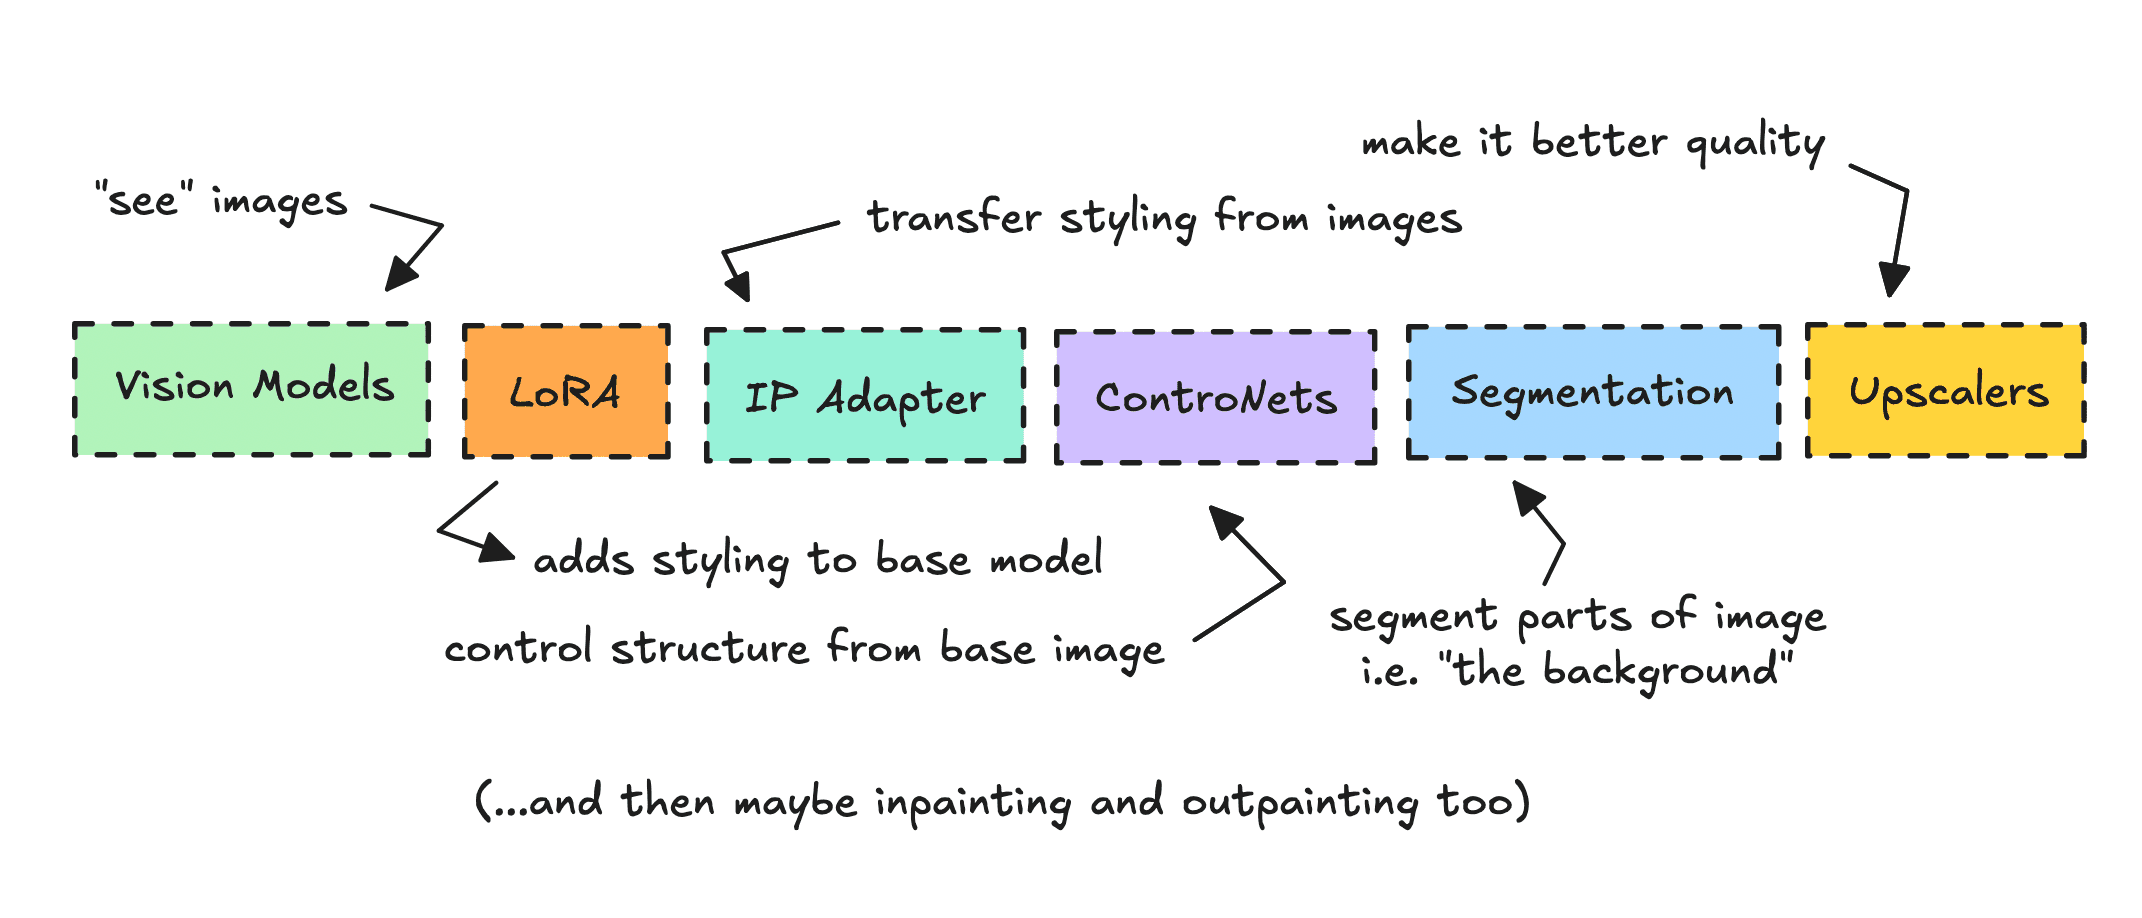
The way I see it, there are a few core technologies — aside from the actual diffusion image model — that you can work with: LoRAs, IP Adapters, ControlNets, Segmentation, Upscalers, and Vision Models.
We’ll use several of these tools to turn the drawing into something digital.
While I was working on this, my grandmother said toy makers would probably like this kind of use case. She’s right — by tweaking the prompt, you can easily create personalized digital images of toys from these drawings.
I do wonder if the toy industry has already started using AI like this, or if they’re leaning on other 3D methods.
Based on this I decided that the core prompt would ask it to create toy like figures from the drawings.
However, you’ll get to experiment with the prompt on your own.
Last time I explored something like this, I used Flux to build an interior designer. This time, I’m using SDXL, which is a better fit if you’re thinking about commercializing your project.
Building the Workflow
In this section we’ll go through the workflow step by step.
We’ll also look at how things change as we layer on different technologies— from computer vision to the IP Adapter to ControlNet — based on the original drawing.
I will be using a drawing that I have generated with AI, this is just for demonstration purposes. The workflow works for more childlike drawings as well.
If you don’t want to build in ComfyUI, you can skip some parts and just focus on how each technology changes the output as it’s added. These tools aren’t exclusive to ComfyUI — they’re available across most image generation apps.
The workflow you’ll find here, and if you want to test it out without booting up ComfyUI you can go here (though there are limits on the API so I can’t promise it always works).
As for how much power you need to run this workflow, I would suggest a GPU with 16GB VRAM and 16GB RAM but you might be able to do with less.
ComfyUI & Custom Nodes
ComfyUI comes with a few standard nodes, but as soon as you start building, you’ll realize you’re missing some tools.
Luckily, there are a lot of builders out there, and the ComfyUI interface makes it easy to download custom node packages using the Manager.
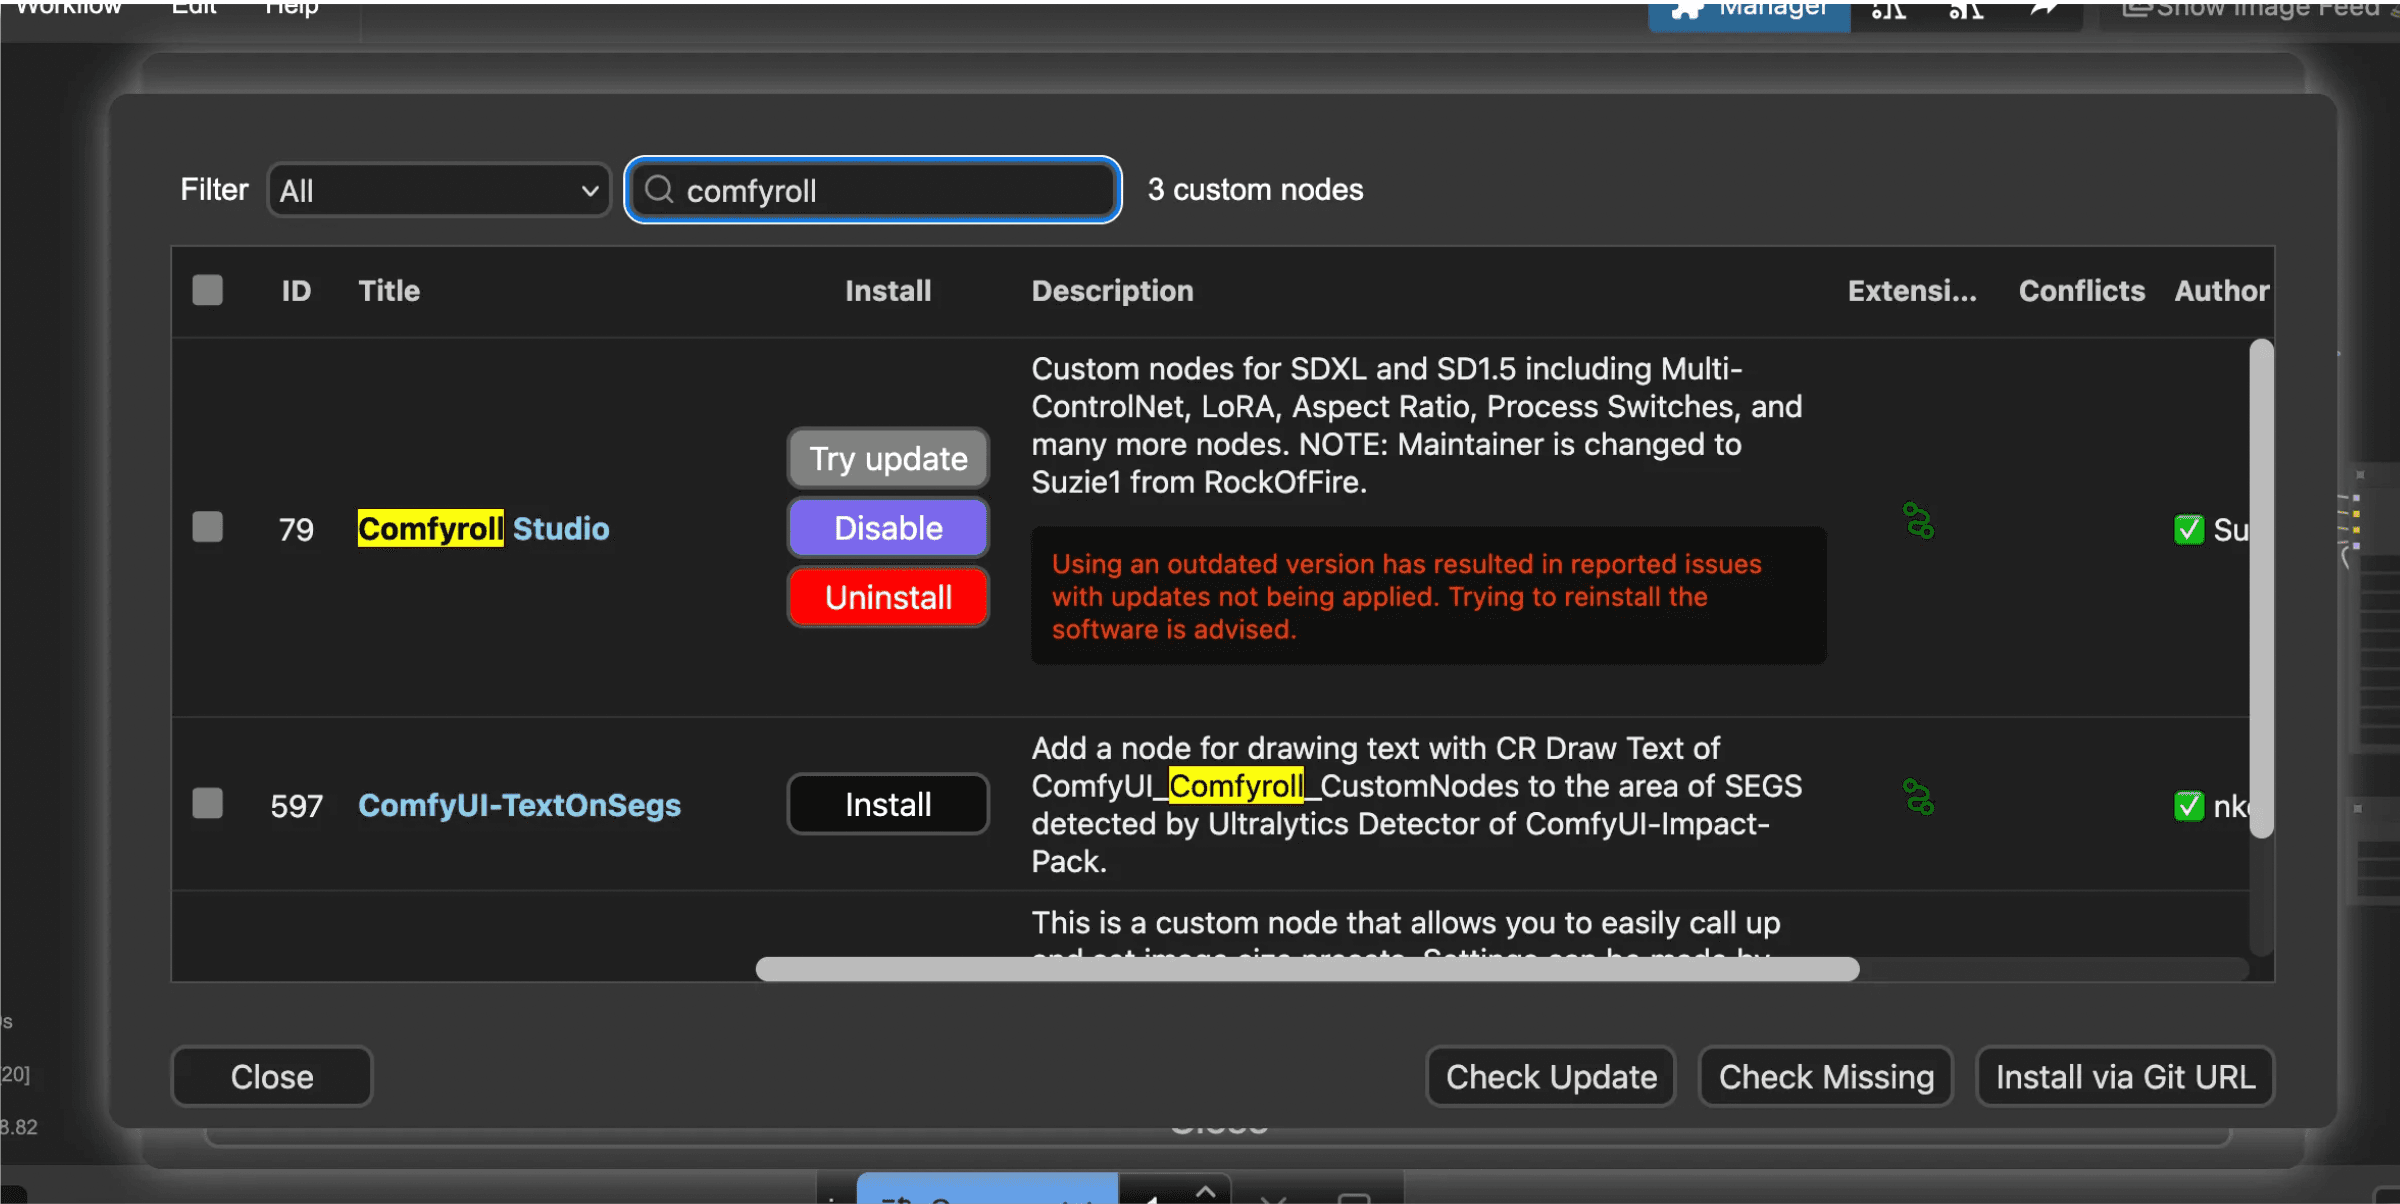
For this workflow, we’ll be using a few custom node packages — IPAdapter Plus, Comfyroll CustomNodes, Miaoshouai Tagger, and Controlnet Aux. So be sure to import them and restart (if needed). You can search for them in “Custom Nodes” directory in ComfyUI’s Manager.
If you load my workflow you can simply look for “Missing Nodes” in ComfyUI’s Manager and install them that way.
Later, when you build the API, you’ll install these through their GitHub repositories, though I’m not covering that part here.
Stable Diffusion XL & LoRAs
I’ve reviewed different base models before, and if you’re new to building, I’d definitely recommend looking into each one to understand their strengths and weaknesses.
For this workflow, I’m using SDXL, which is a newer model that’s better for commercial use.
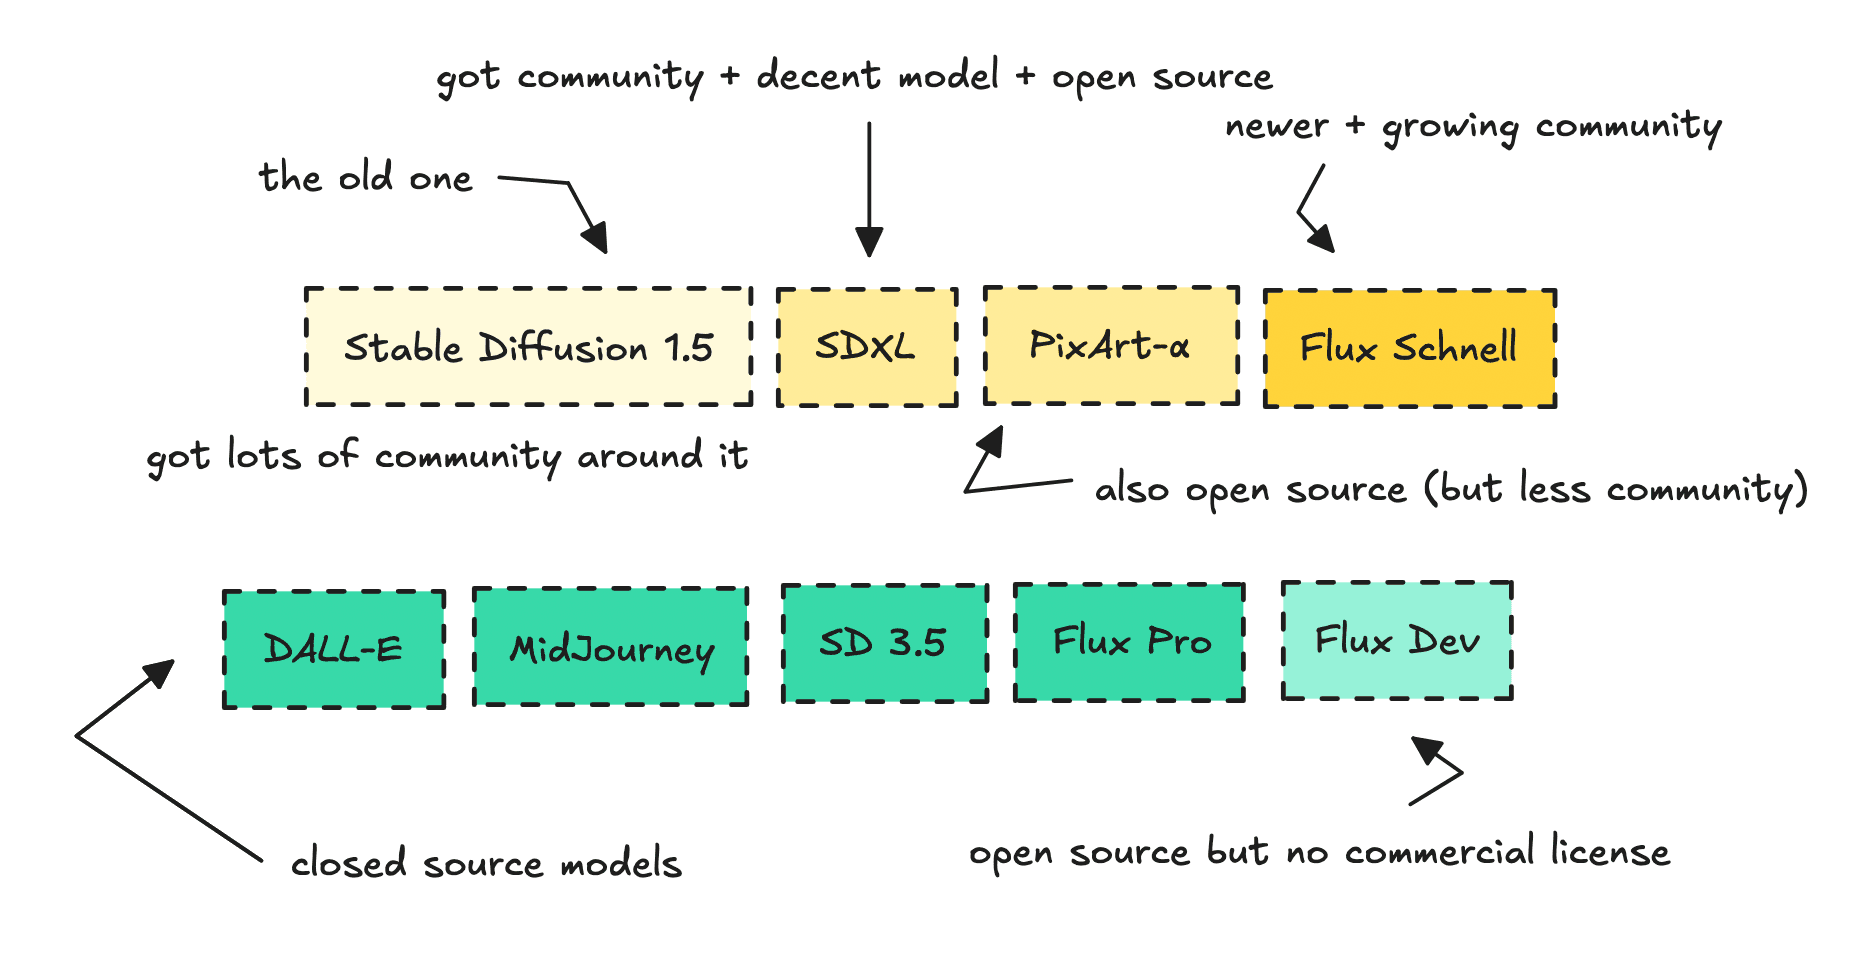
Using a newer model might give you better results, but the adjacent tools and technologies can be subpar — mostly because the open-source community hasn’t had that much time to build around it yet.
Last time, I used Flux Dev with some of their official tools. For this one, I wanted to go with SDXL, which is fully open source, meaning we can build workflows like this and even sell them commercially.
I’ll be using an SDXL checkpoint called ProtoVision XL, and I’ll add a LoRA (a style add-on) called Juggernaut Cinematic XL.
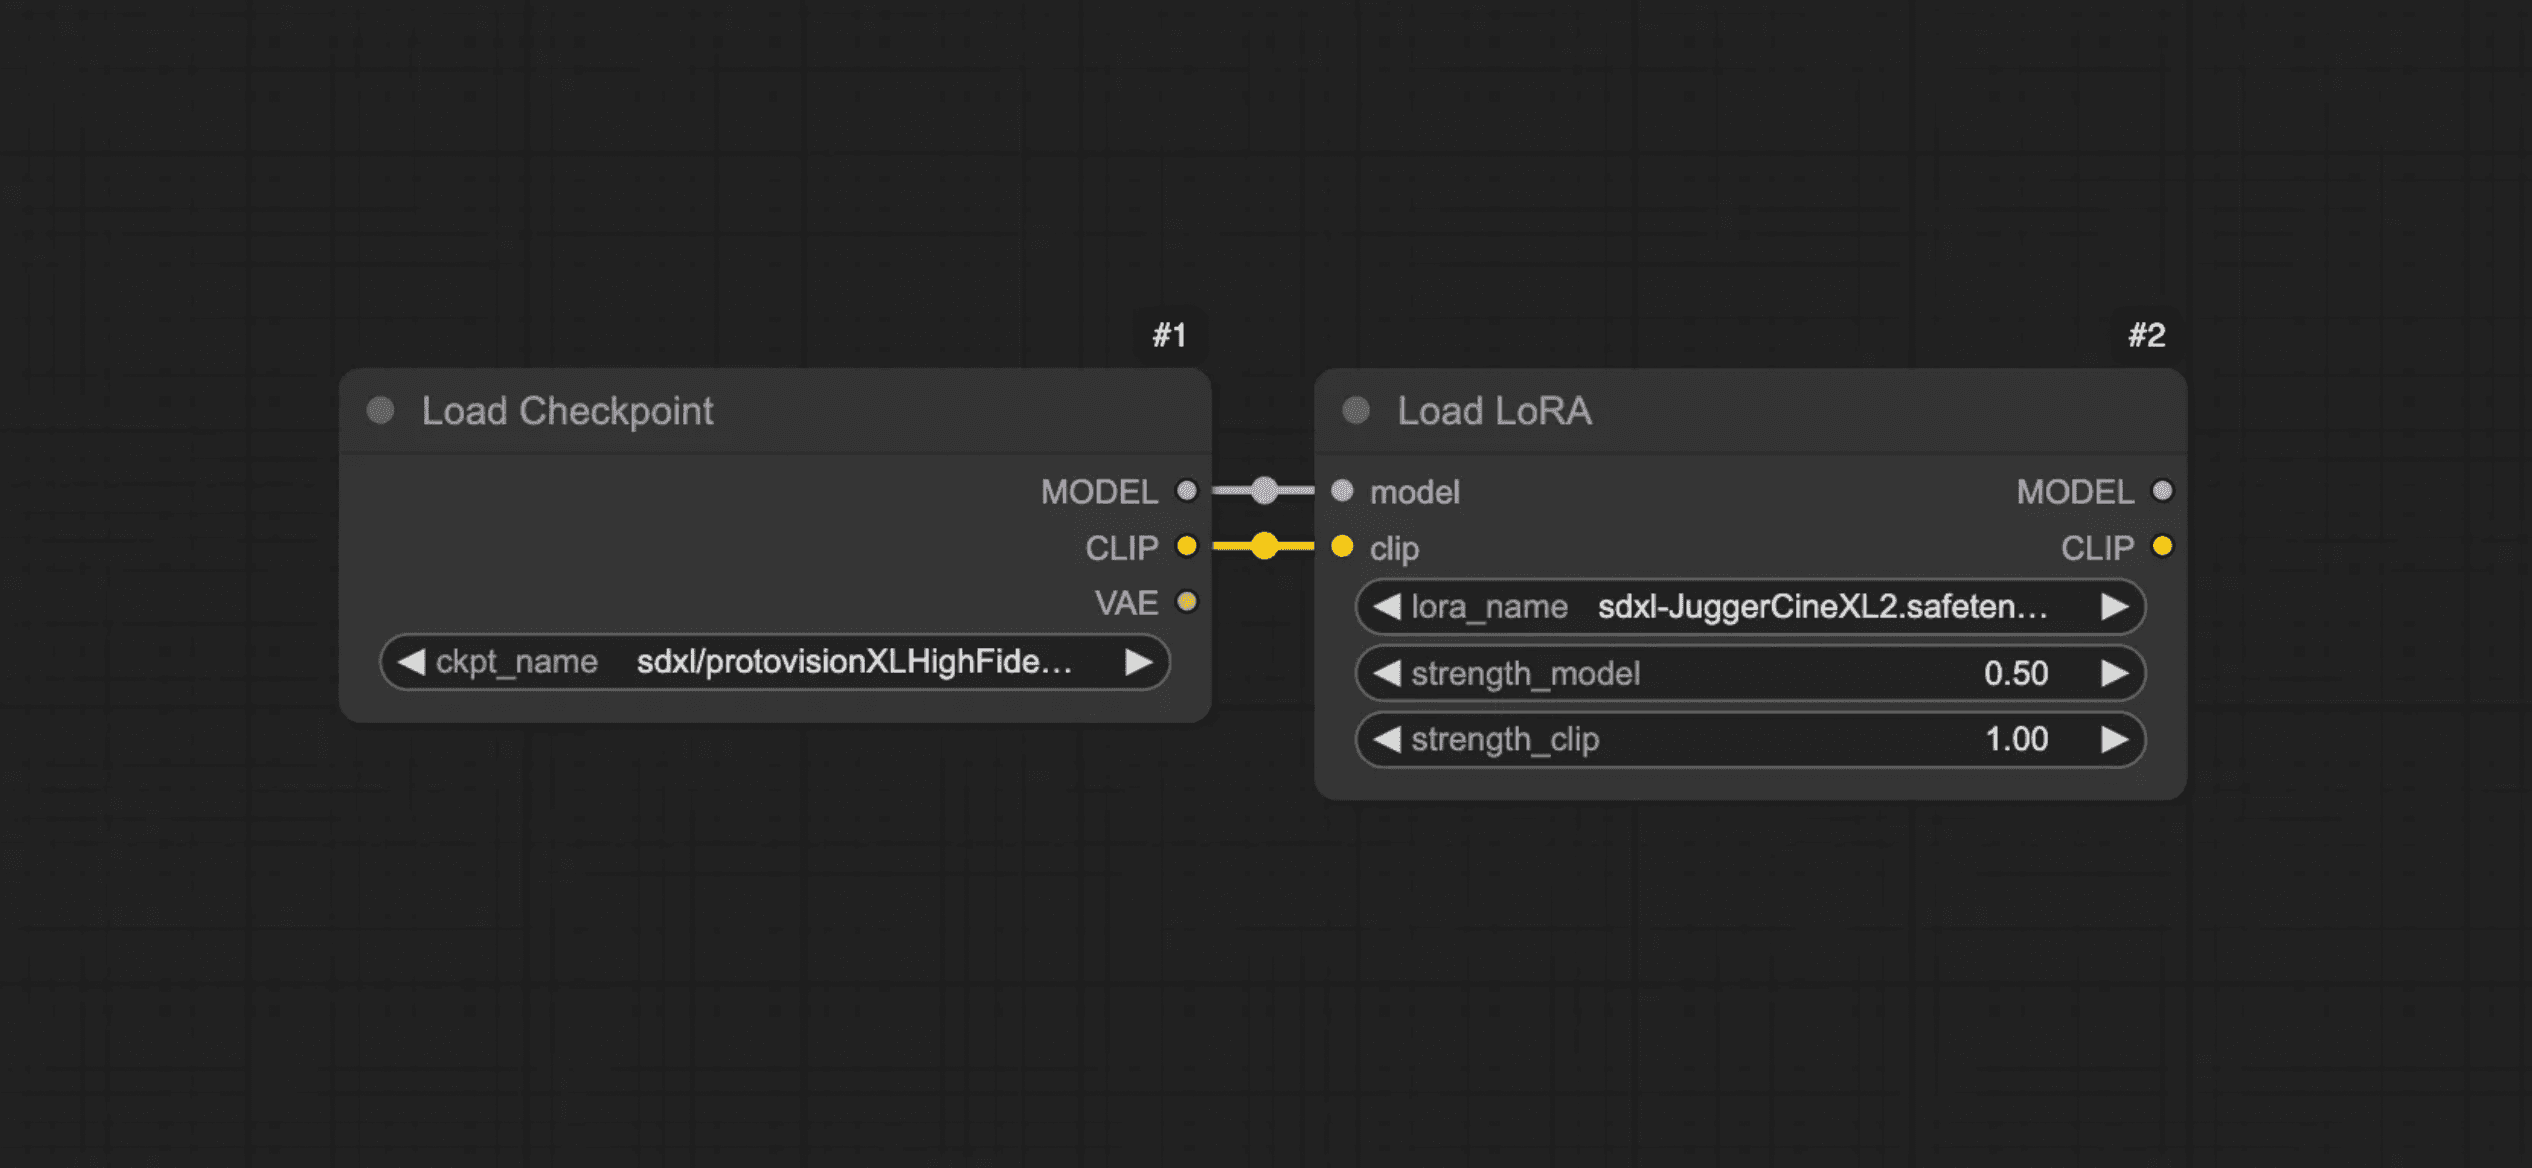
You can use a different checkpoint or swap the LoRA — Juggernaut XL is a solid alternative for the base, though it’ll give you very different results possibly looking more “real”.
Just remember to import the correct models and connect the Checkpoint node to the LoRA node.
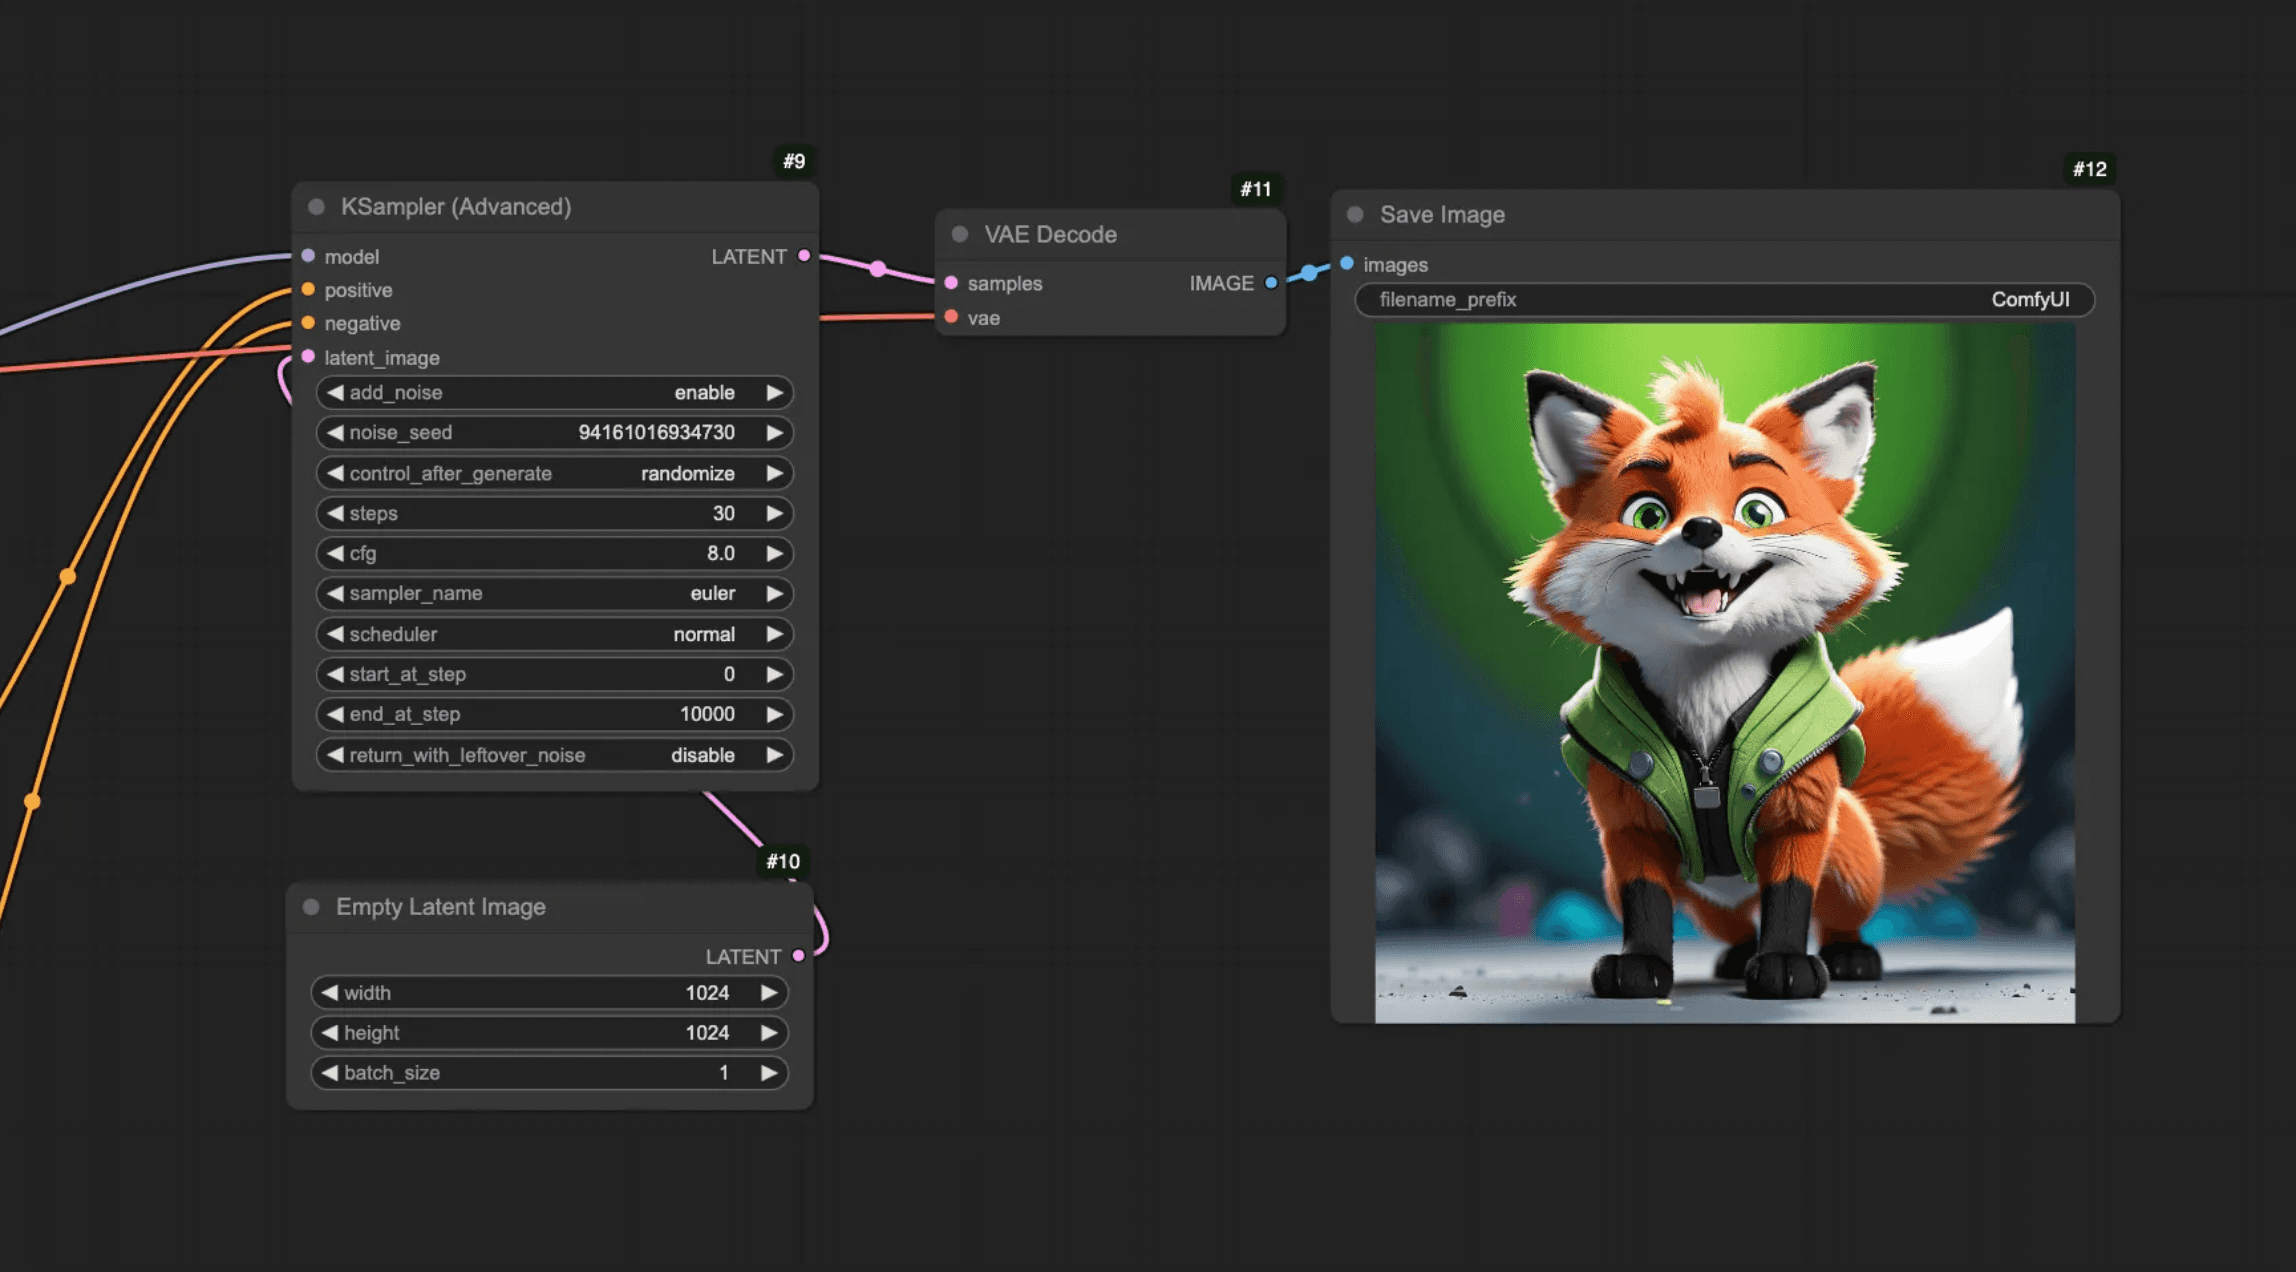
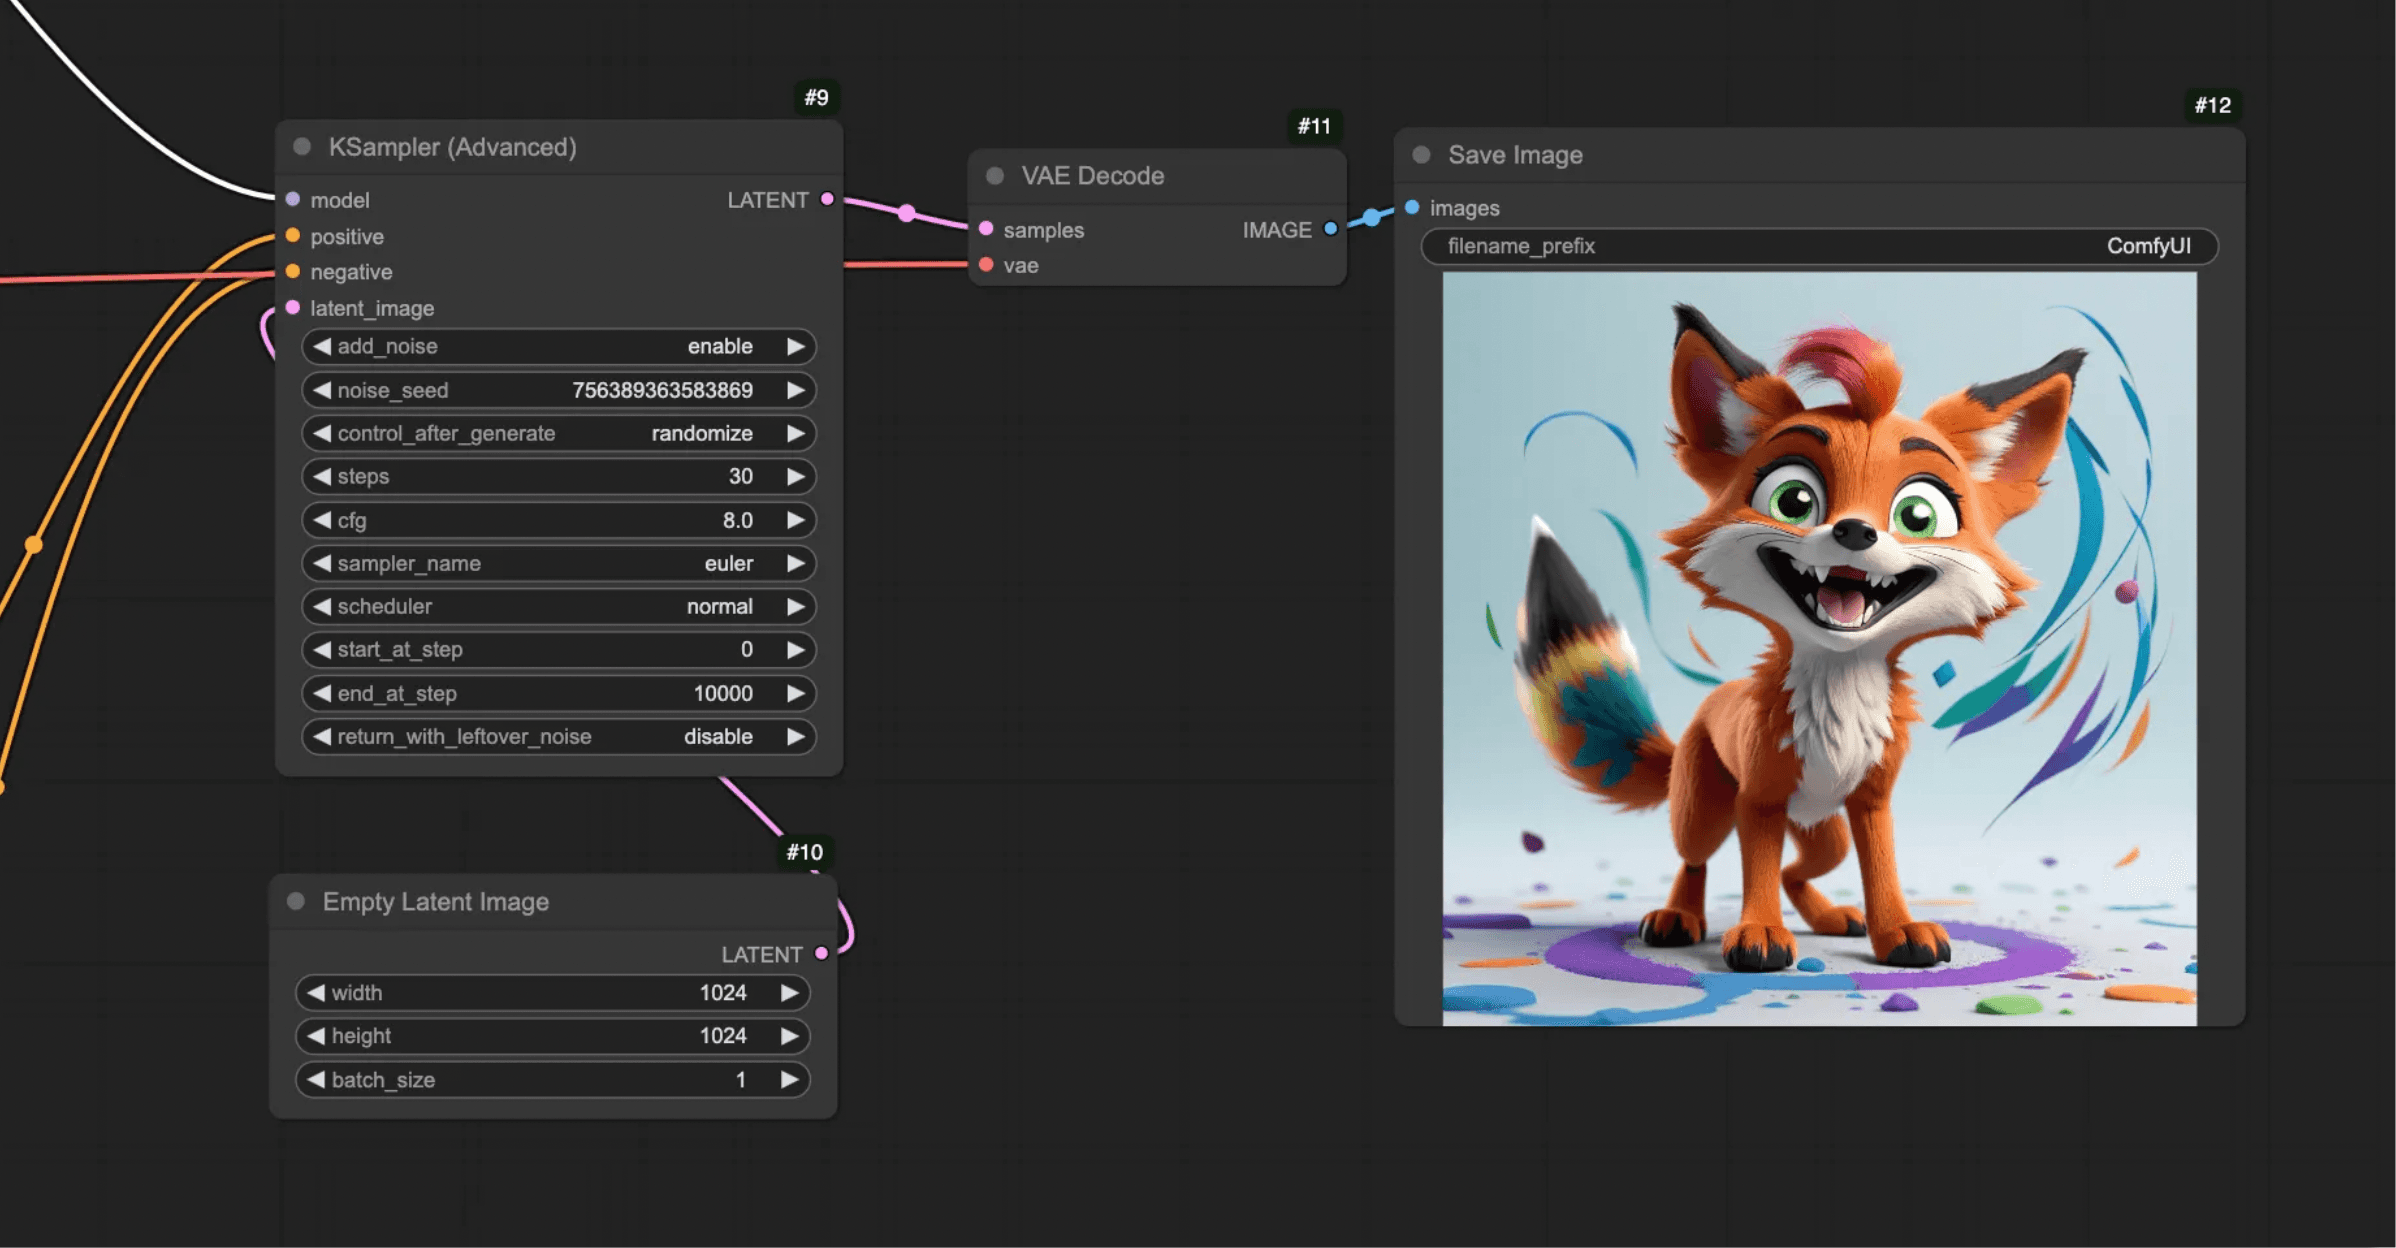
We can try running it from here.

See the example workflow above — just to remind you of how ComfyUI generates images.
Since we haven’t connected the drawing yet, we’ll naturally get results we’re not looking for.
CV for Prompt Generation
This part is where we start connecting computer vision to the workflow.
Even though image-to-text alone won’t give us the results we’re after, it still plays a key role. To apply it, we need a vision model, and I went with Florence2 by Microsoft.
If you’re new to computer vision, you can check out one of my earlier articles here on identifying traffic levels in Norway.
Florence2 tries to caption the image, but that’s not enough — we need a more detailed explanation of the drawing. I found a version of Florence2 fine-tuned for prompt generation by MiaoshouAI that worked very well.
He had already created a custom node as well (part of the package we imported earlier). To use the node, search for MiaoshouAI Tagger in the node list (double left-click on the graph to bring it up).
You’ll also want to add a Load Image node and a Show Text node (if available).
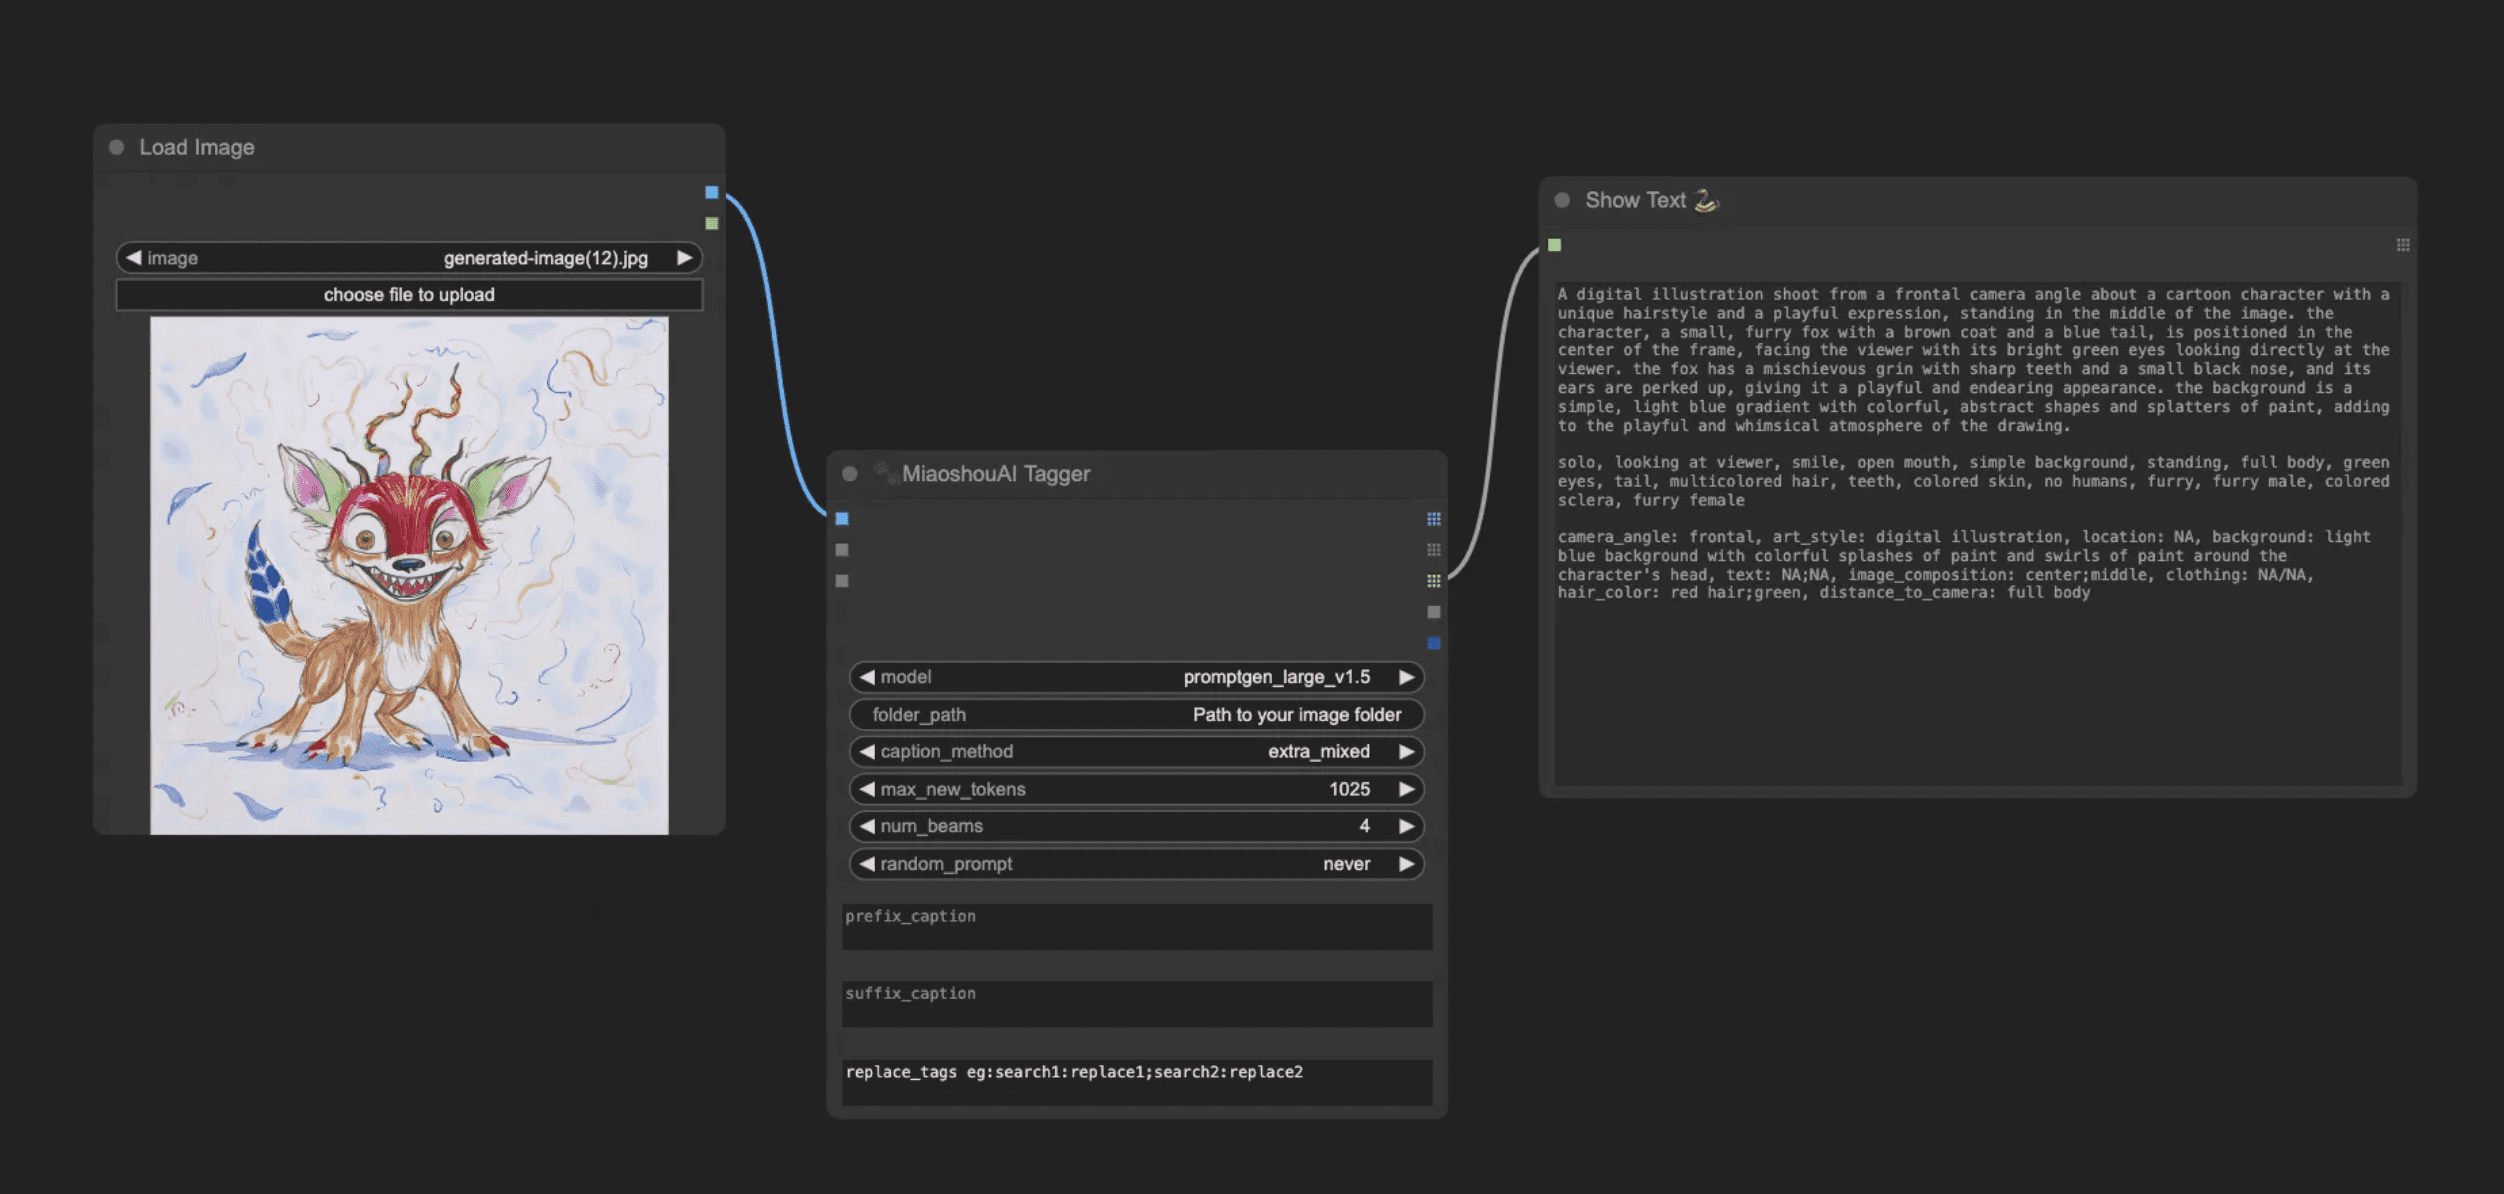
The model should be downloaded automatically but if it doesn’t you can put it under models/prompt_gen.
After you’ve connected them, and adding the drawing, you can run it to see what kind of captioning you get from it. We’ll use this captioning as a base prompt — but we’ll also need to add a second part describing what we actually want to generate.
As mentioned earlier, the goal is to create aesthetic-looking toys from sketches. So find a Text node and write in what you want — for example: “stuffed animal, cinematic style, detailed stitching,” etc.
If you want to get better at prompting I would refer you to this intermediate guide.
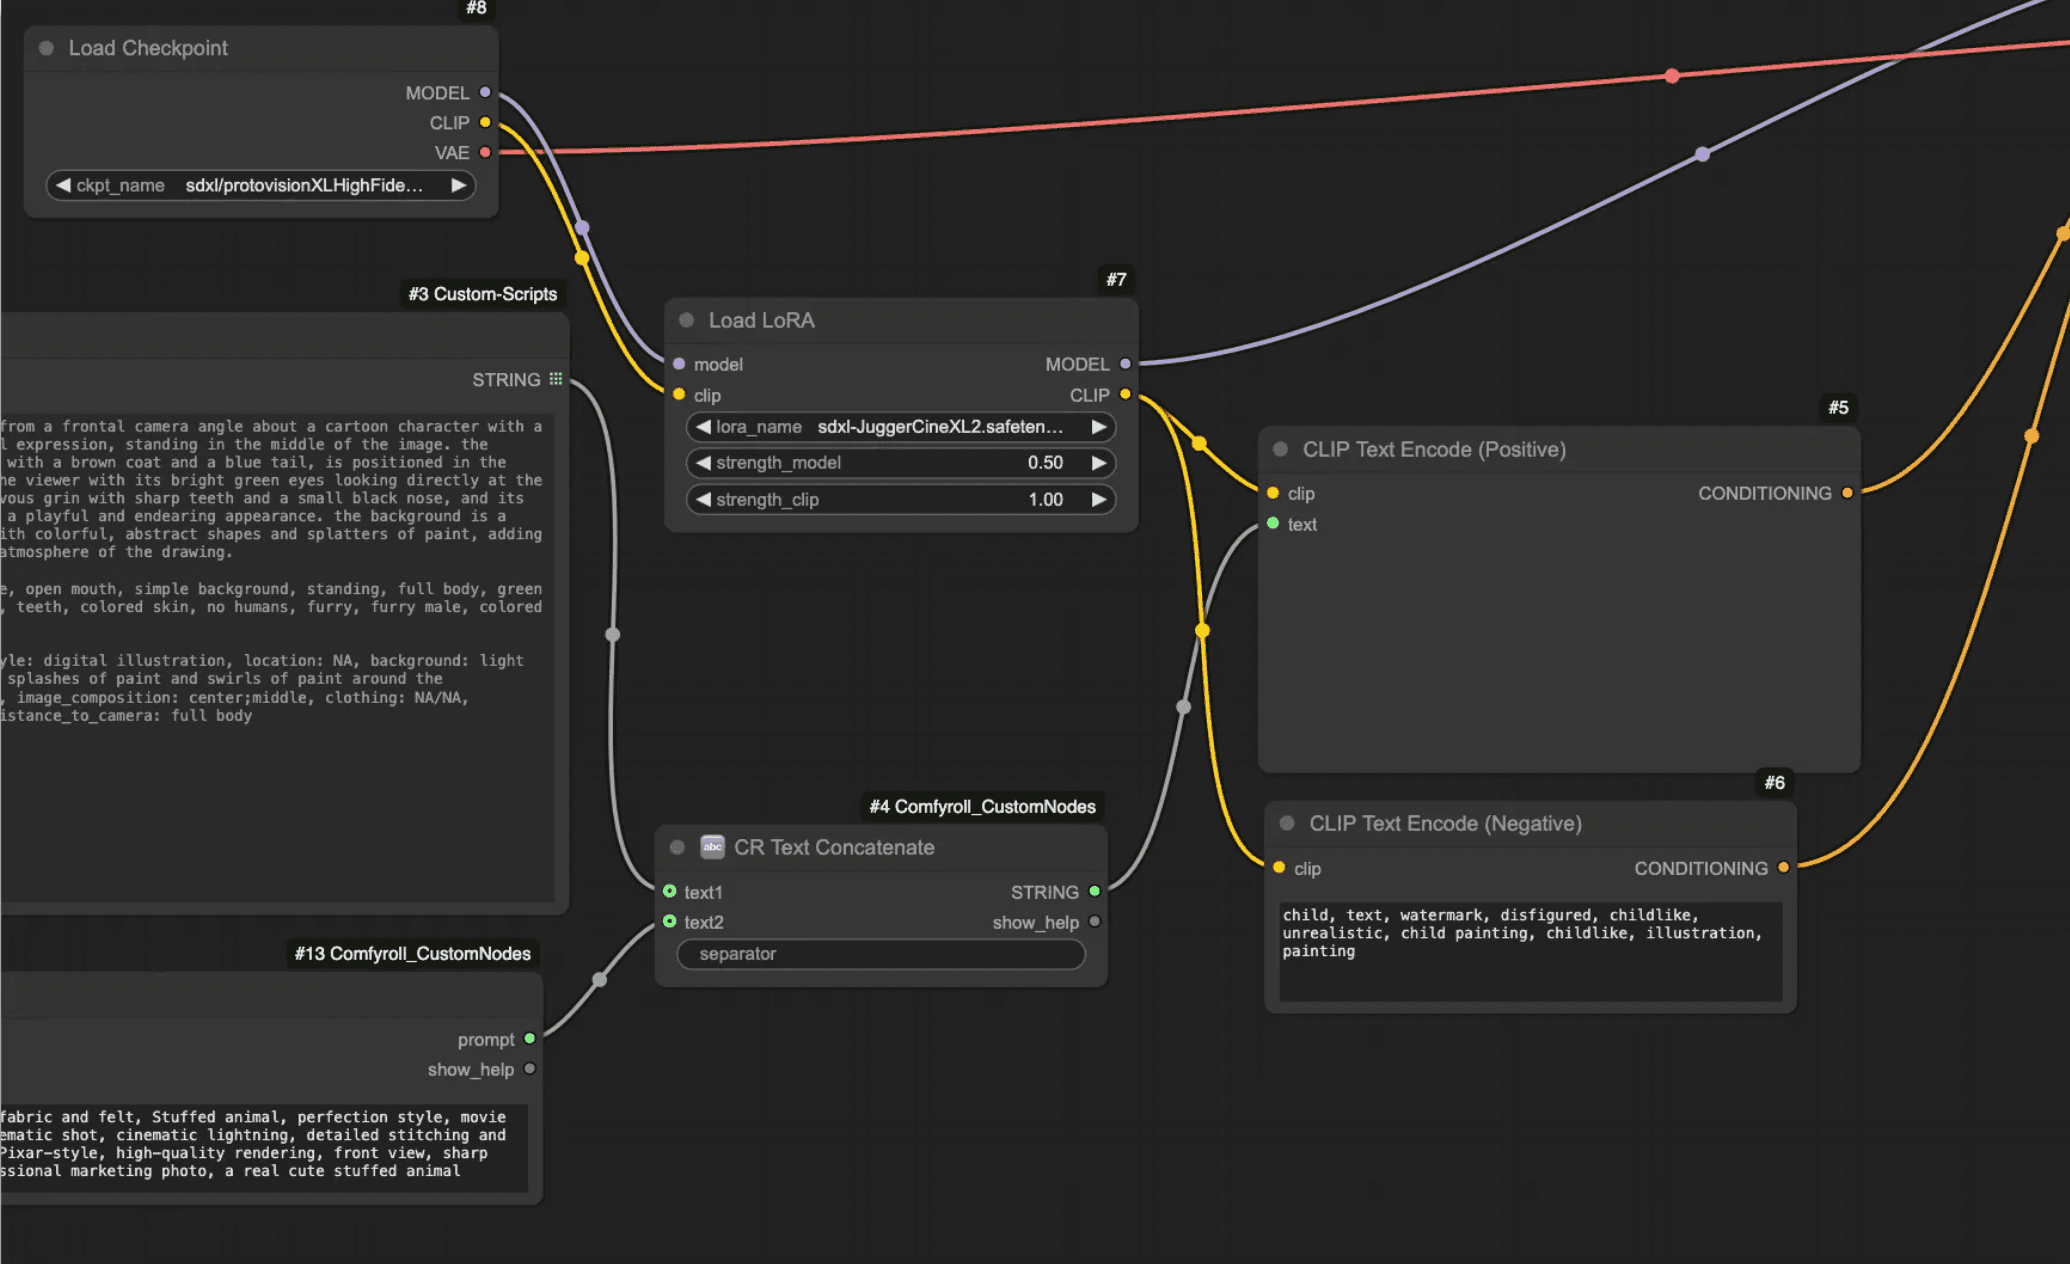
Next, connect the output from the MiaoshouAI Tagger and the Text node using a CR Text Concatenate node (from the Comfyroll Studio package).
Then use a CLIP Text Encode node, switch it to “text and clip,” and connect the string output from the CR Text Concatenate node.
You can run it now to preview what you get using just computer vision, the base model, and the LoRA.
If you compare it to the earlier output, it’s a clear improvement — but we’re still not at the level we want.
To push things further, we’ll add on an IP Adapter next.
Working with IP Adapters
IP Adapters help transfer styling from an image, which is very useful — describing aesthetics like colors, texture, and overall style in words is hard without it.
That said, we don’t want to transfer the entire sketch directly. If we do, we’ll just end up with a slightly polished version of the original drawing. The key is applying the IP Adapter with enough strength to transfer some styling, but not so much that it overpowers the prompt and LoRA.
I’ve written more about IP Adapters for style transfer here, if you’re curious about how it works, what results you can achieve, and how to think in terms of the models you can use.
To apply an IP Adapter, we reuse the Load Image node from earlier, and then add an IPAdapter Model Loader, Load CLIP Vision, and an IPAdapter Advanced node.
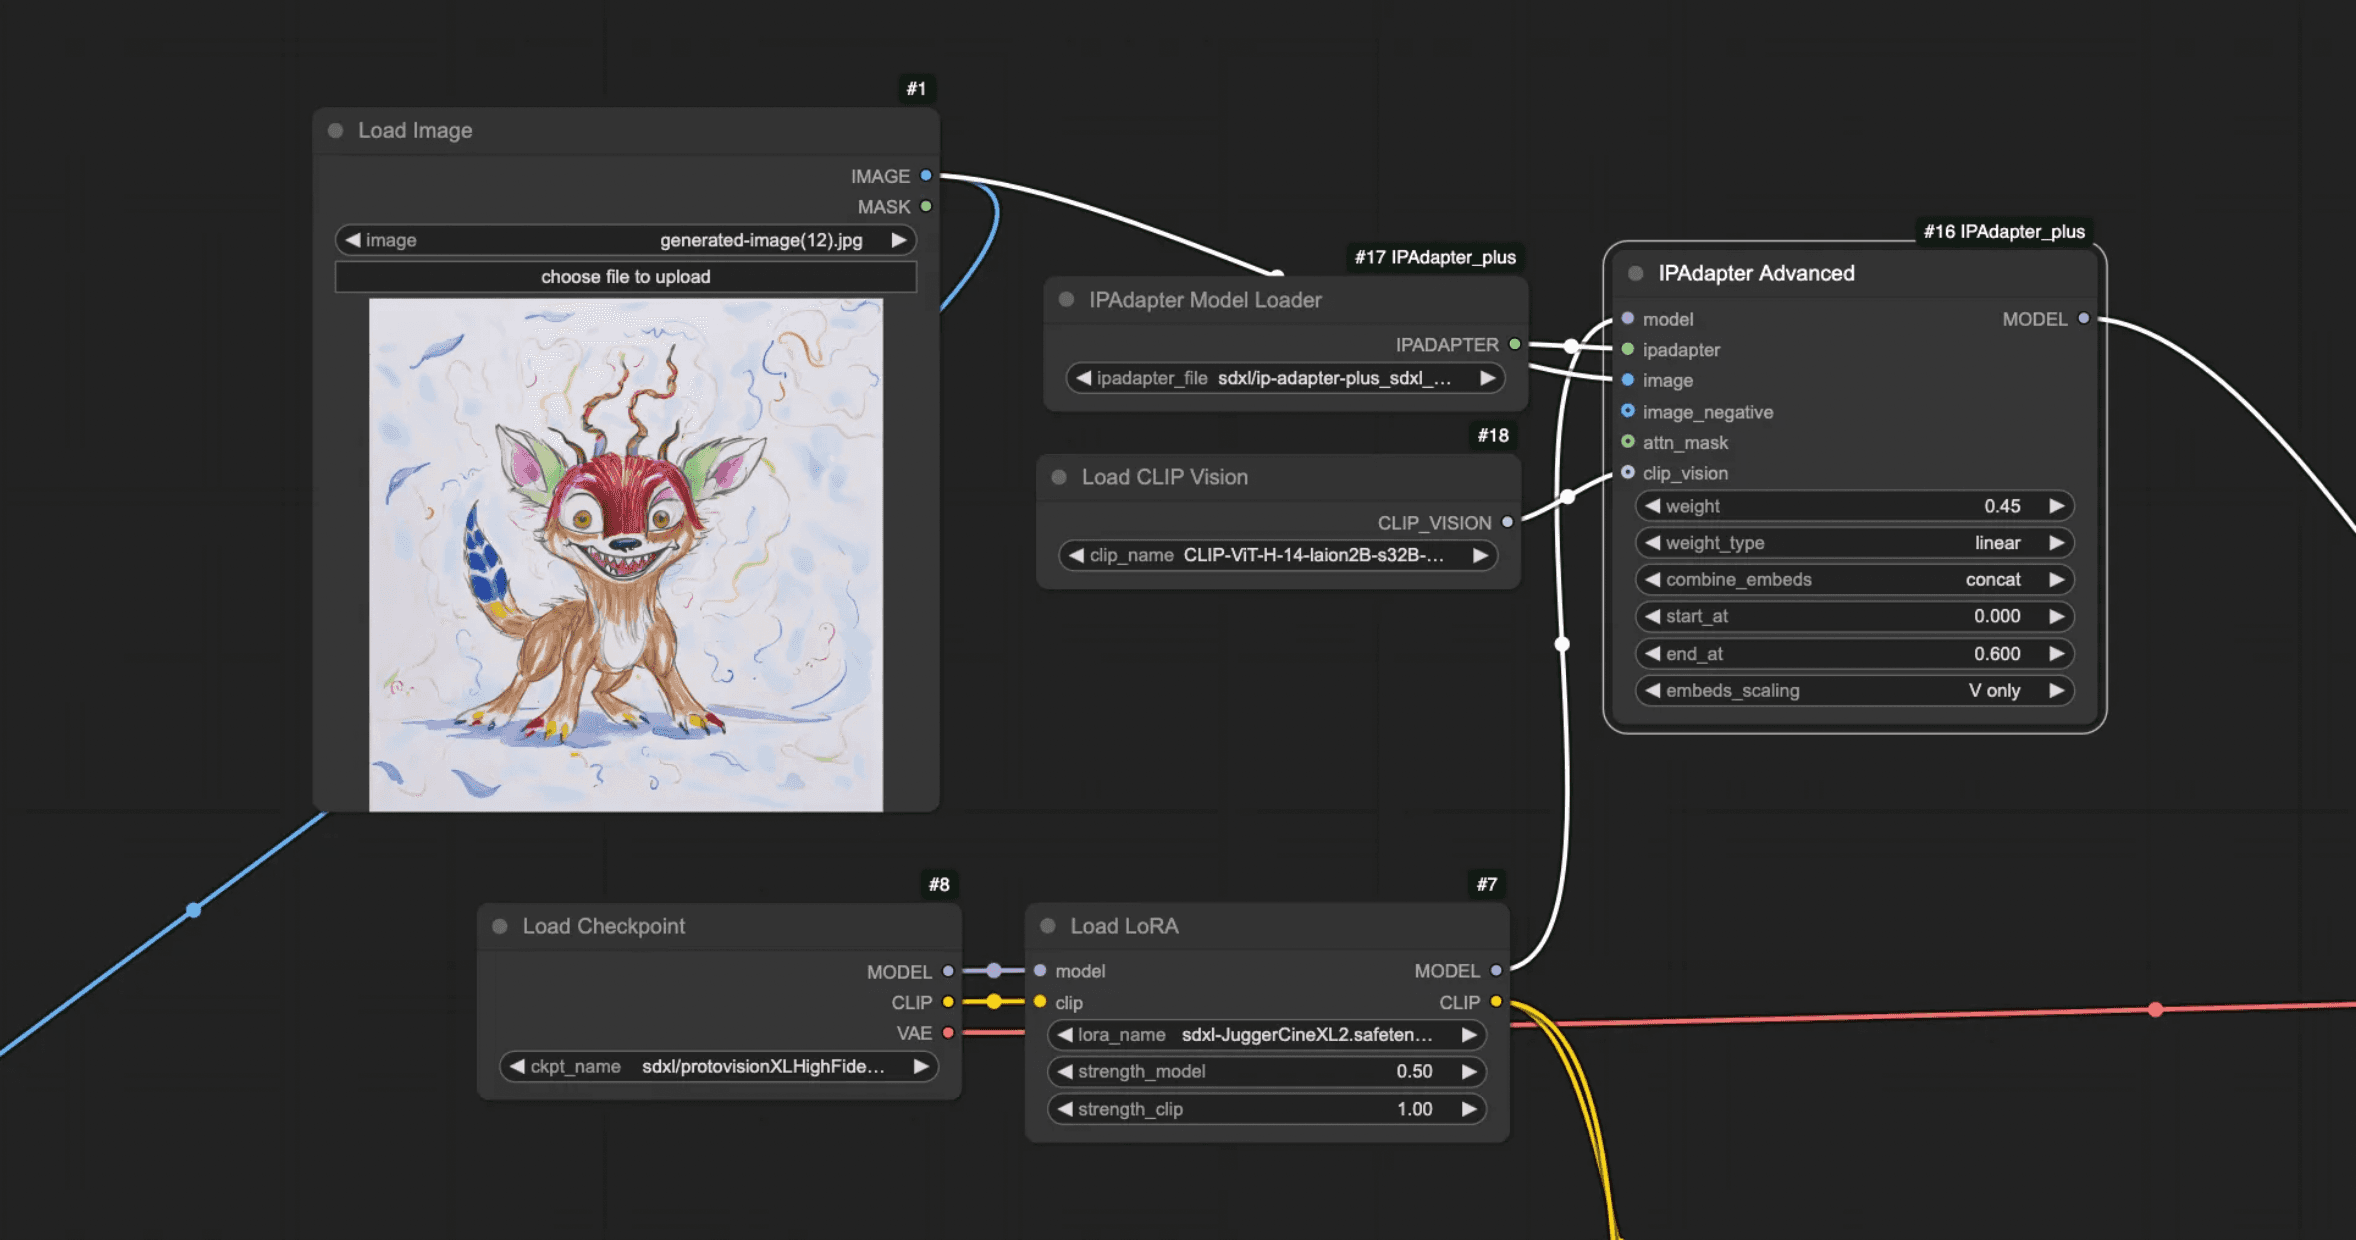
The IP Adapter runs through the model line, meaning it should go between the LoRA and the KSampler.
I set the weight at 0.45 and set the end percentage at 0.6 in the IPAdapter Advanced node, though you might want to go lower depending on your image.
Make sure you’ve placed the correct models in the right folders. In this case, I’m using the IP Adapter Plus model for SDXL, and the corresponding CLIP is ViT-H-14. You can use the standard model too, but it’ll transfer fewer details.
Once that’s set up, test it out. But be careful — if your IP Adapter strength is too high, it can easily overpower your prompt.
Now that we’re using both computer vision and an IP Adapter, the result is noticeably better.
It sticks closer to the original sketch than using computer vision alone. Still, there’s more we can do — we can bring in a ControlNet to make it adhere to the original better.
Working with ControlNets
ControlNet models let you guide and control what the AI creates by feeding it structured inputs. In my last article, I used a depth map to follow the layout of a bedroom and generate different interior designs.
Here, we’ll use Canny edge detection to force the model to stick to specific lines, with adjustable strength.
To apply it, we first need to preprocess the image. I’m using the AIO Aux Preprocessor from the ControlNet Aux package we imported earlier and then I am setting it to CannyEdgePreprocessor.
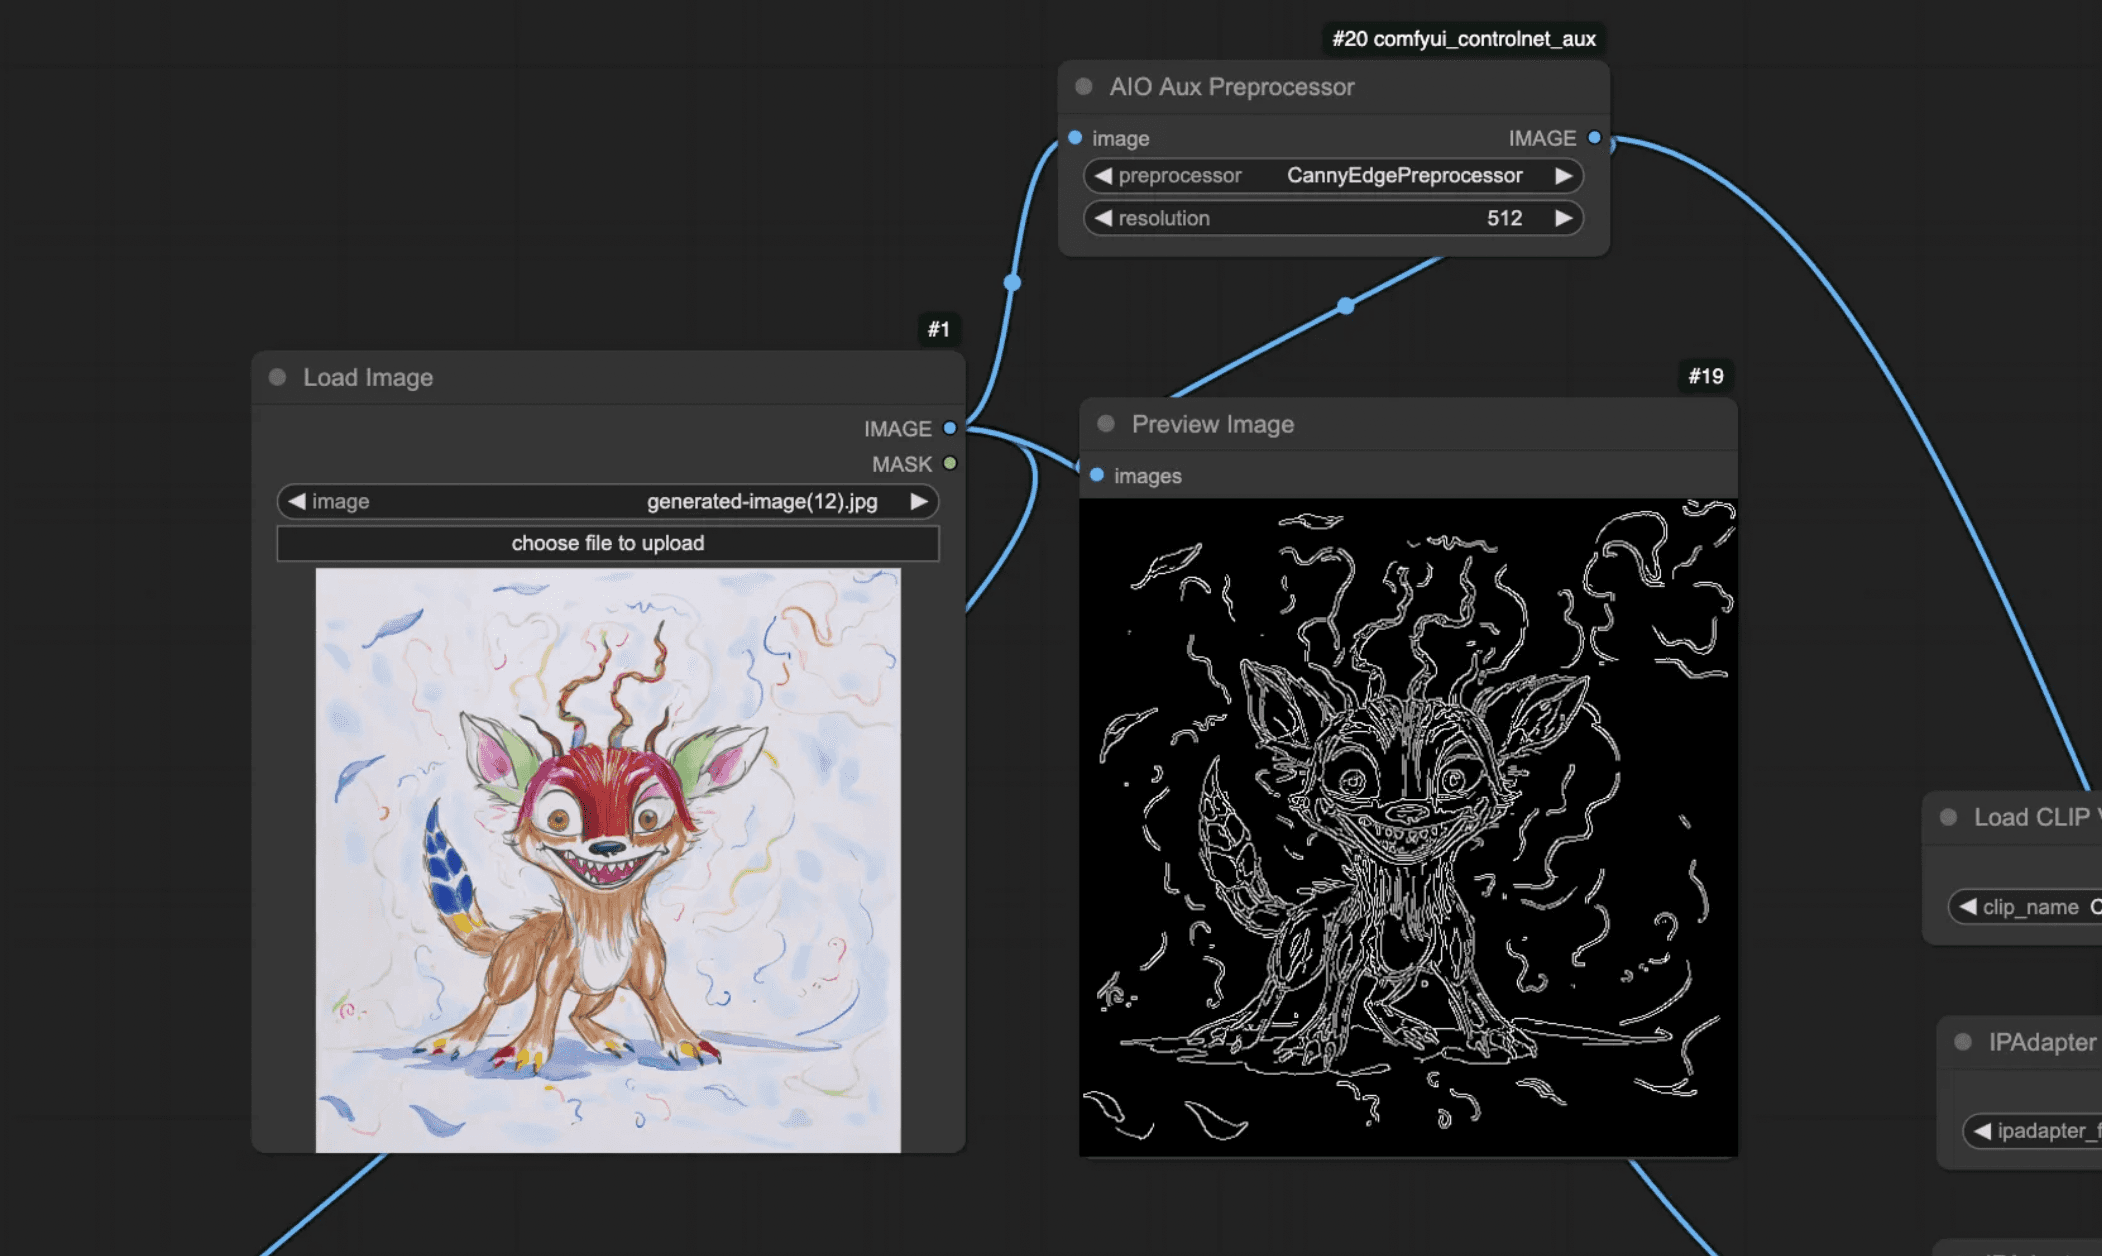
We can add a Preview Image node to see what it looks like once it has been processed.
After that, you’ll add the Load ControlNet Model node and the Apply ControlNet node.
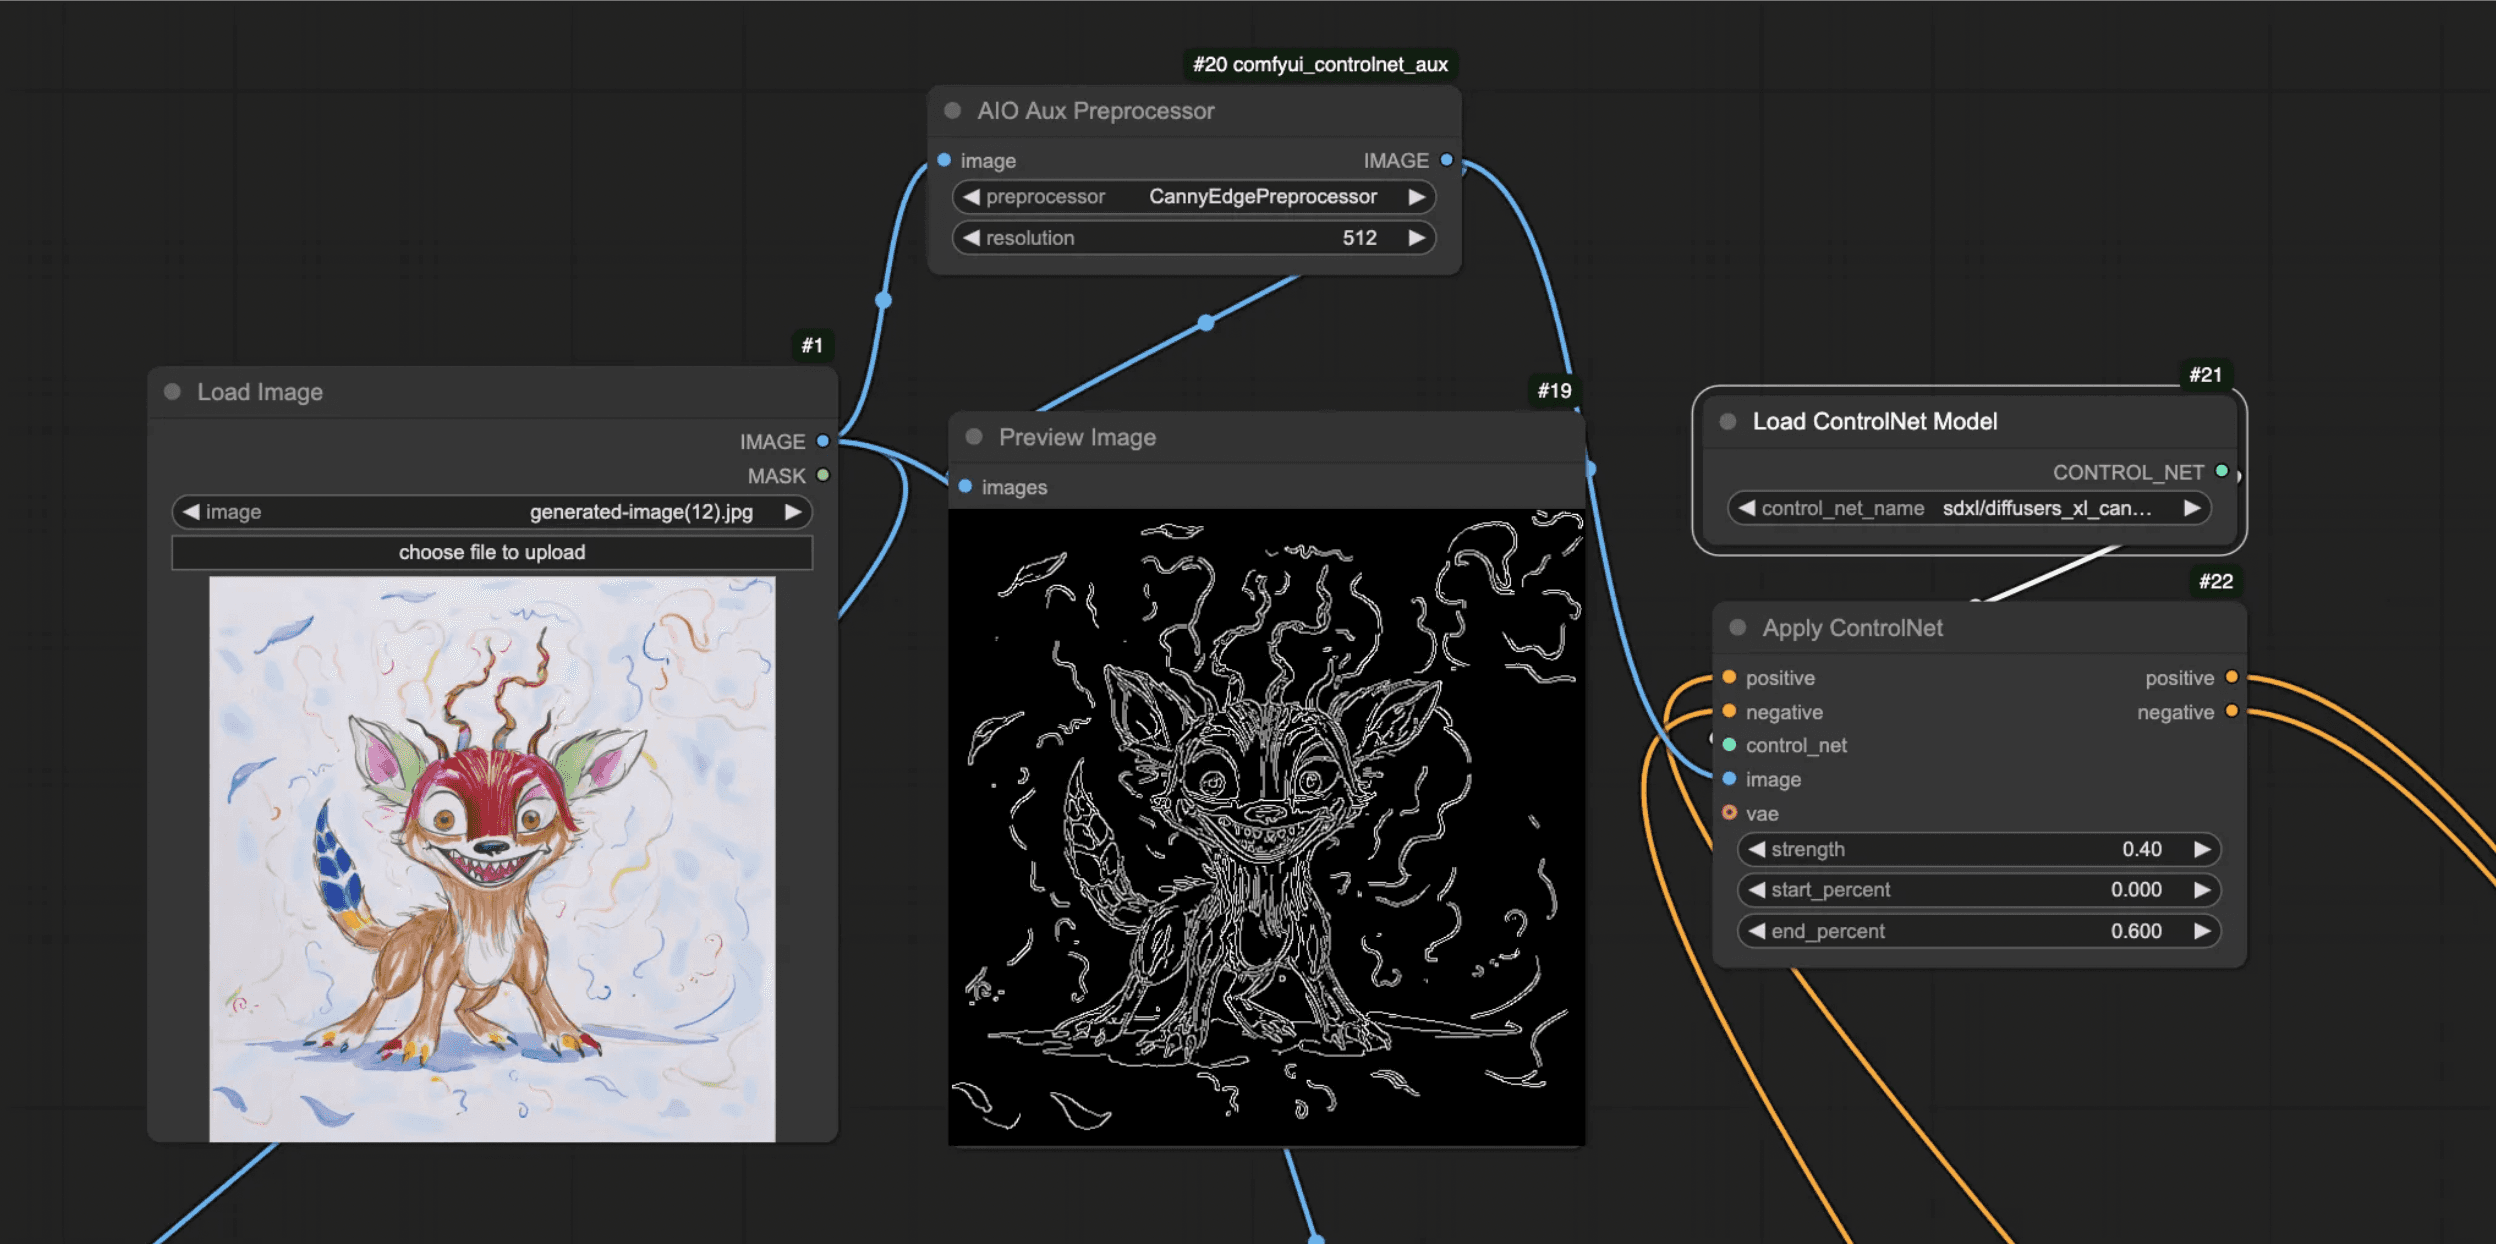
You’ll need to choose which ControlNet model to set in the Load ControlNet Model node— just make sure you’re using the SDXL version of the Canny model, and that it’s in the right model folder.
If you need a guide of ControlNets and models available I would look at this guide.
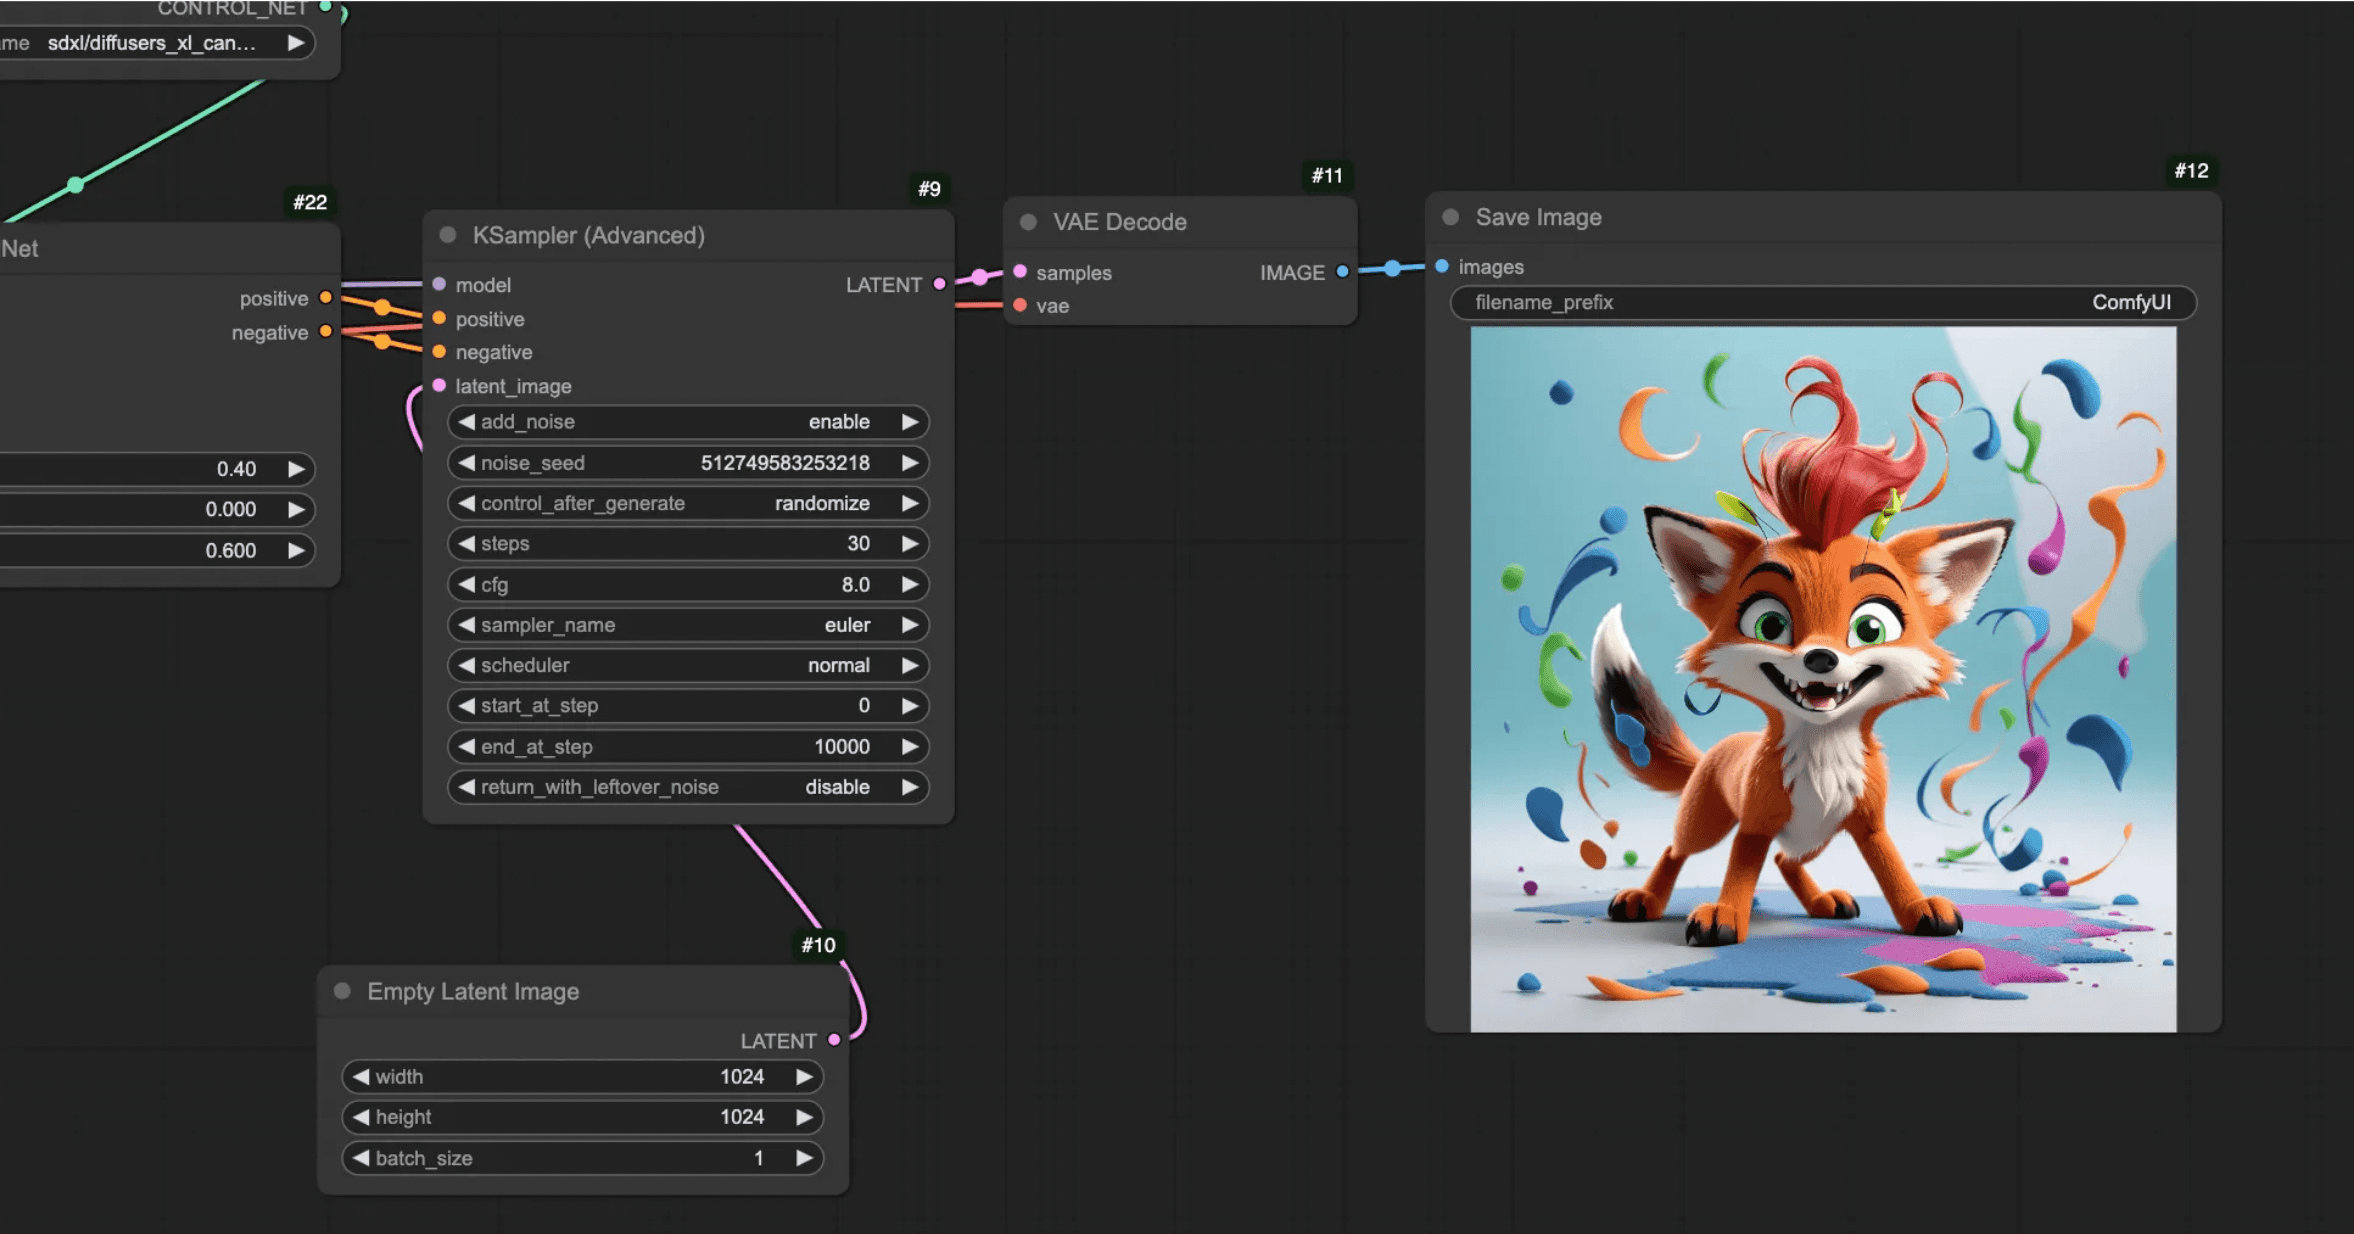
Unlike an IP Adapter, ControlNet is applied on the conditioning line — meaning the encoded prompts pass through the Apply ControlNet node.
You’ll set the negative and positive encoded prompts through this Apply ControlNet node and then use the positive and negative in the KSampler.
You can run it to see the results.
Keep in mind: once I added ControlNet to the workflow, I had to decrease the IP Adapter strength — otherwise, the prompt telling it to generate a stuffed animal lost its effect.
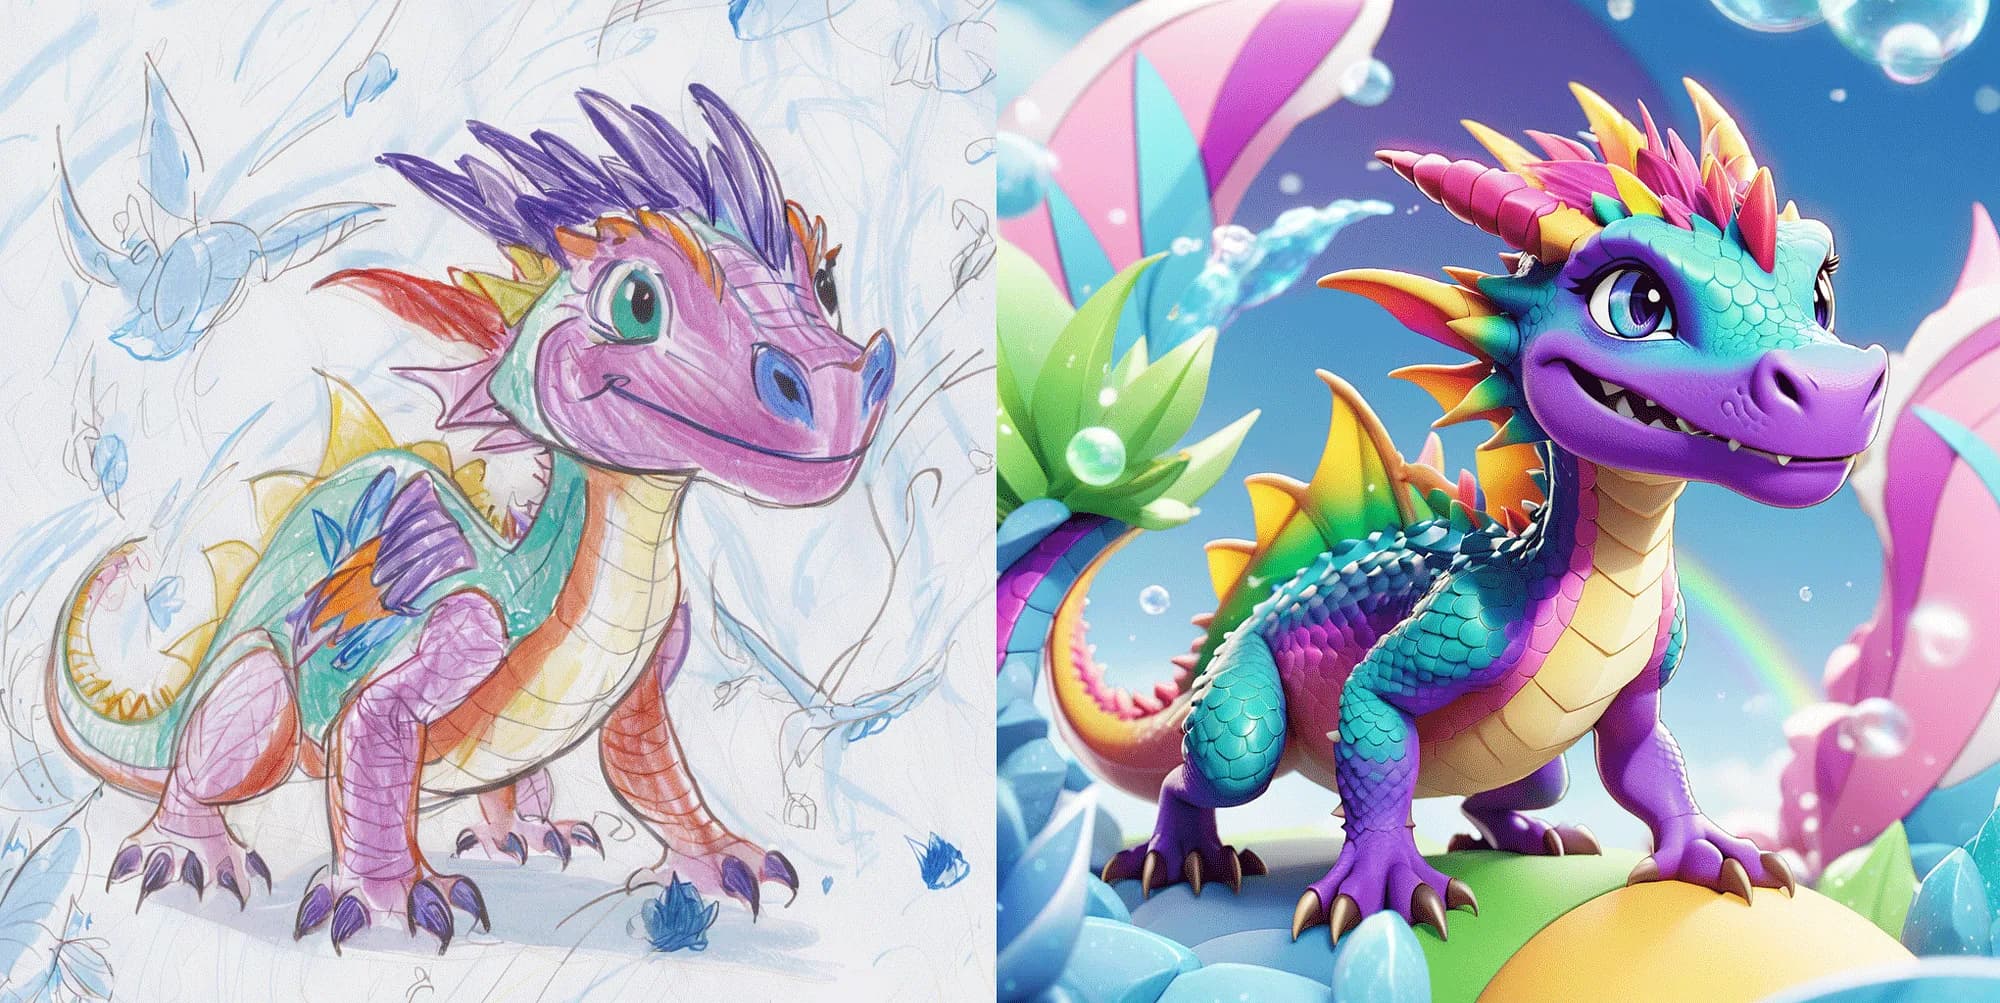
When comparing the previous result and the result with the ControlNet, the improvement is clear. The model sticks much more closely to the original sketch.
You’ll be able to recognize how the structure rather than the style — as with the IP Adapter — is transferred when working with the ControlNet.
To push the results even further, try playing around with the ControlNet strength as well as the start and end percentages.
You can do this directly in the web app (although don’t go nuts on the amount of image generations you do as it’s free).
Finishing Thoughts
Now the finished workflow you can find here and it will look like something below.
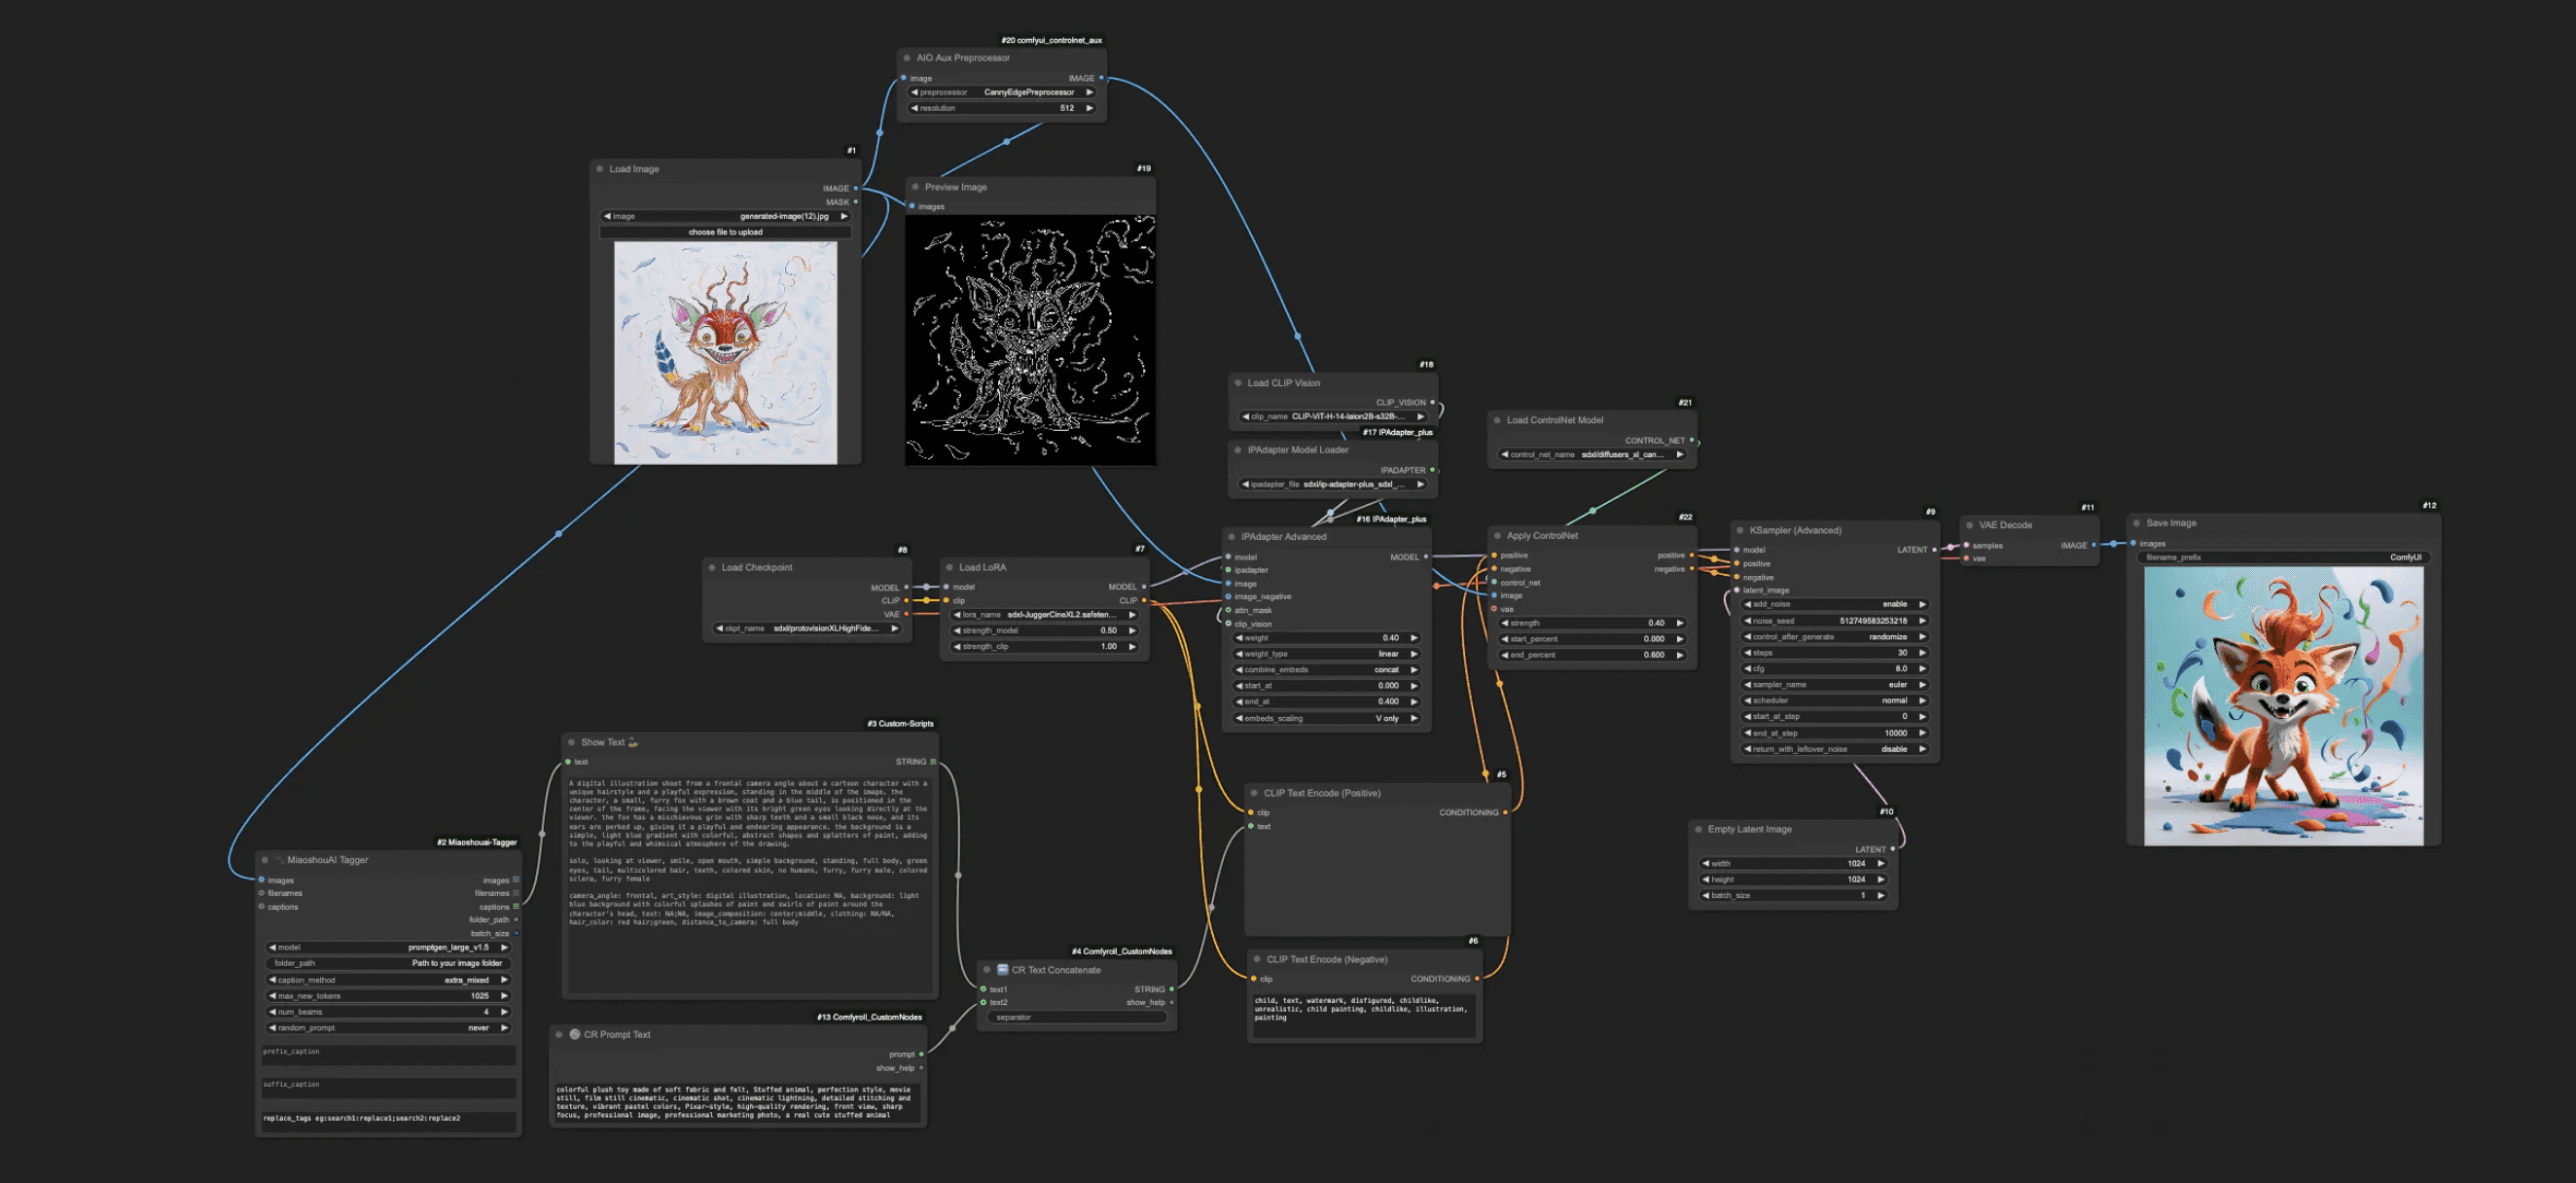
Just make sure you import the correct custom node packages and set the models in the correct places or it will give you errors.
Ideally, you’d clean it up by using groups and organizing the nodes a bit more.
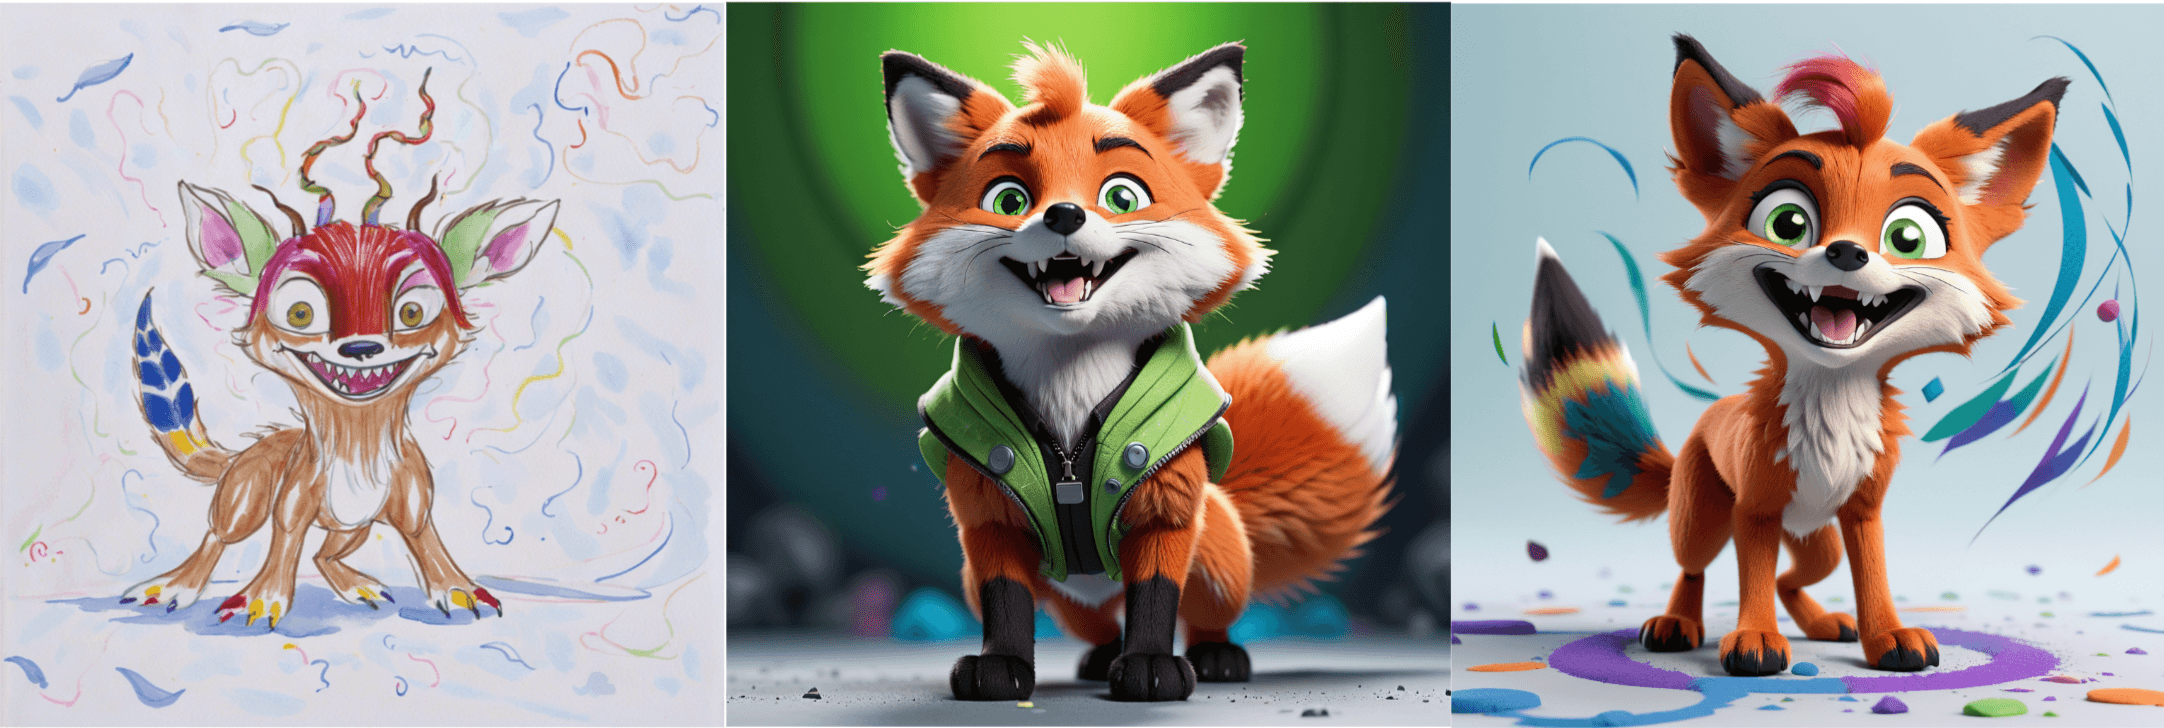
Looking back at the results from each stage, it’s clear how the technologies — computer vision, IP Adapter, and ControlNet — adds on to the result and improves the output.
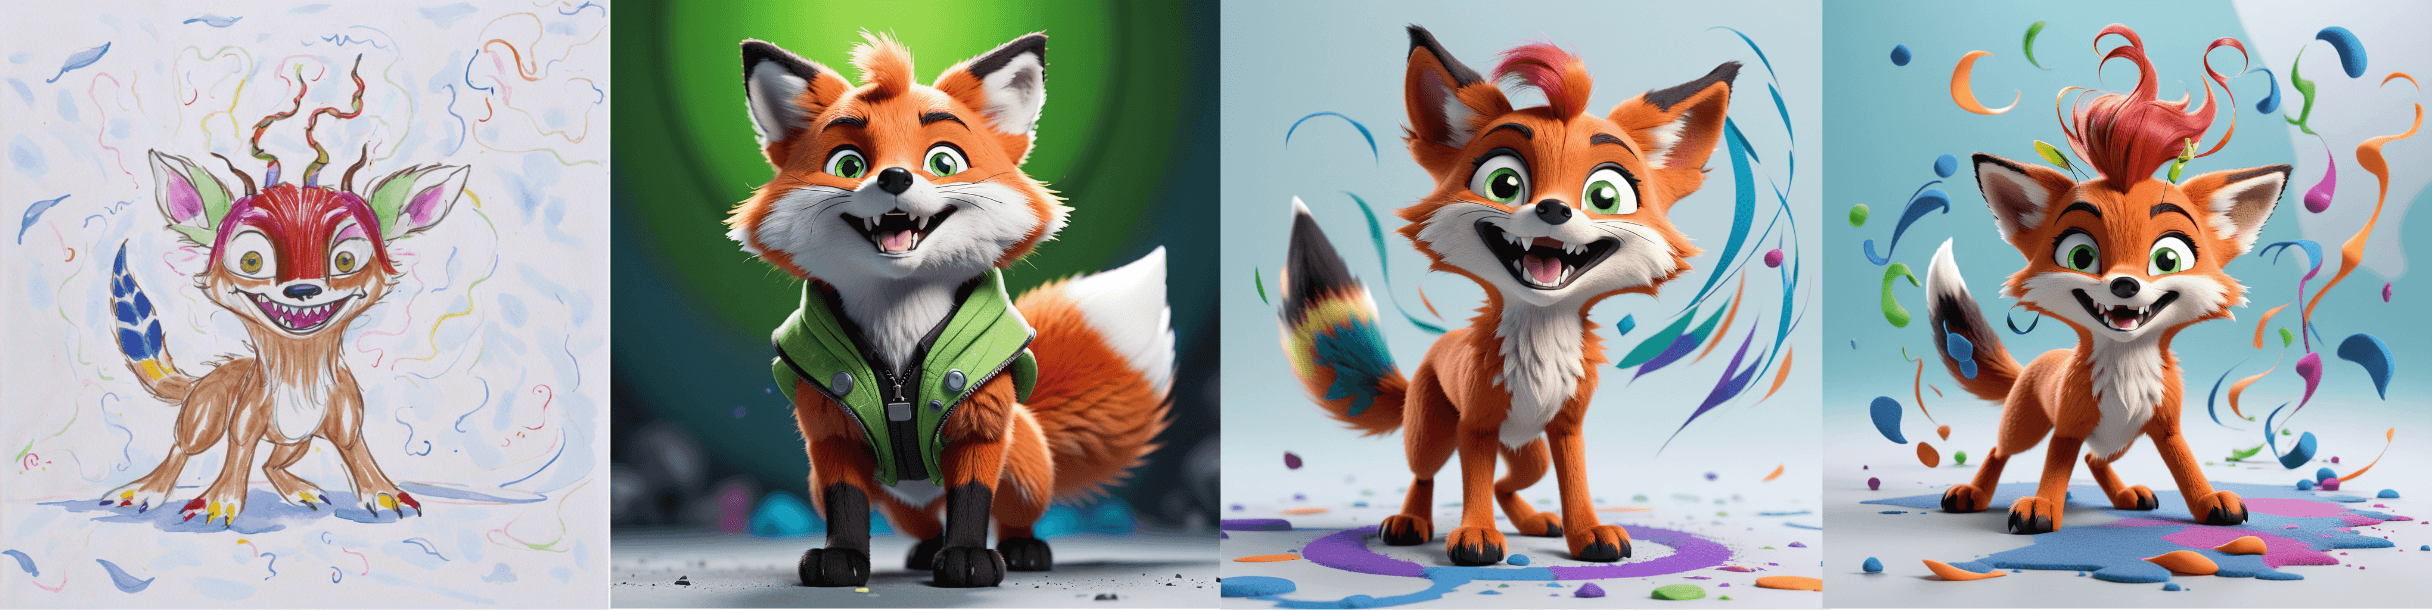
You can also try this for more childlike drawings, as these ones I have used here are quite advanced.
How to Improve the Application
Although we’re already seeing some good results, there are still a few things you might want to refine.
How you apply the settings really matters — but even then, you might notice that the same settings don’t always produce the same output. That’s because the KSampler uses a random seed that changes with each run.
If you want more consistent results, you can add a custom KSampler and set a fixed seed.
When testing this on users, parents loved seeing their kids’ drawings come to life — but struggled a bit with the settings. I found that most drawings need different settings to look right and I had to help them with it.
So if you’re planning to do something similar, I’d recommend refining the workflow to avoid needing too many manual adjustments.
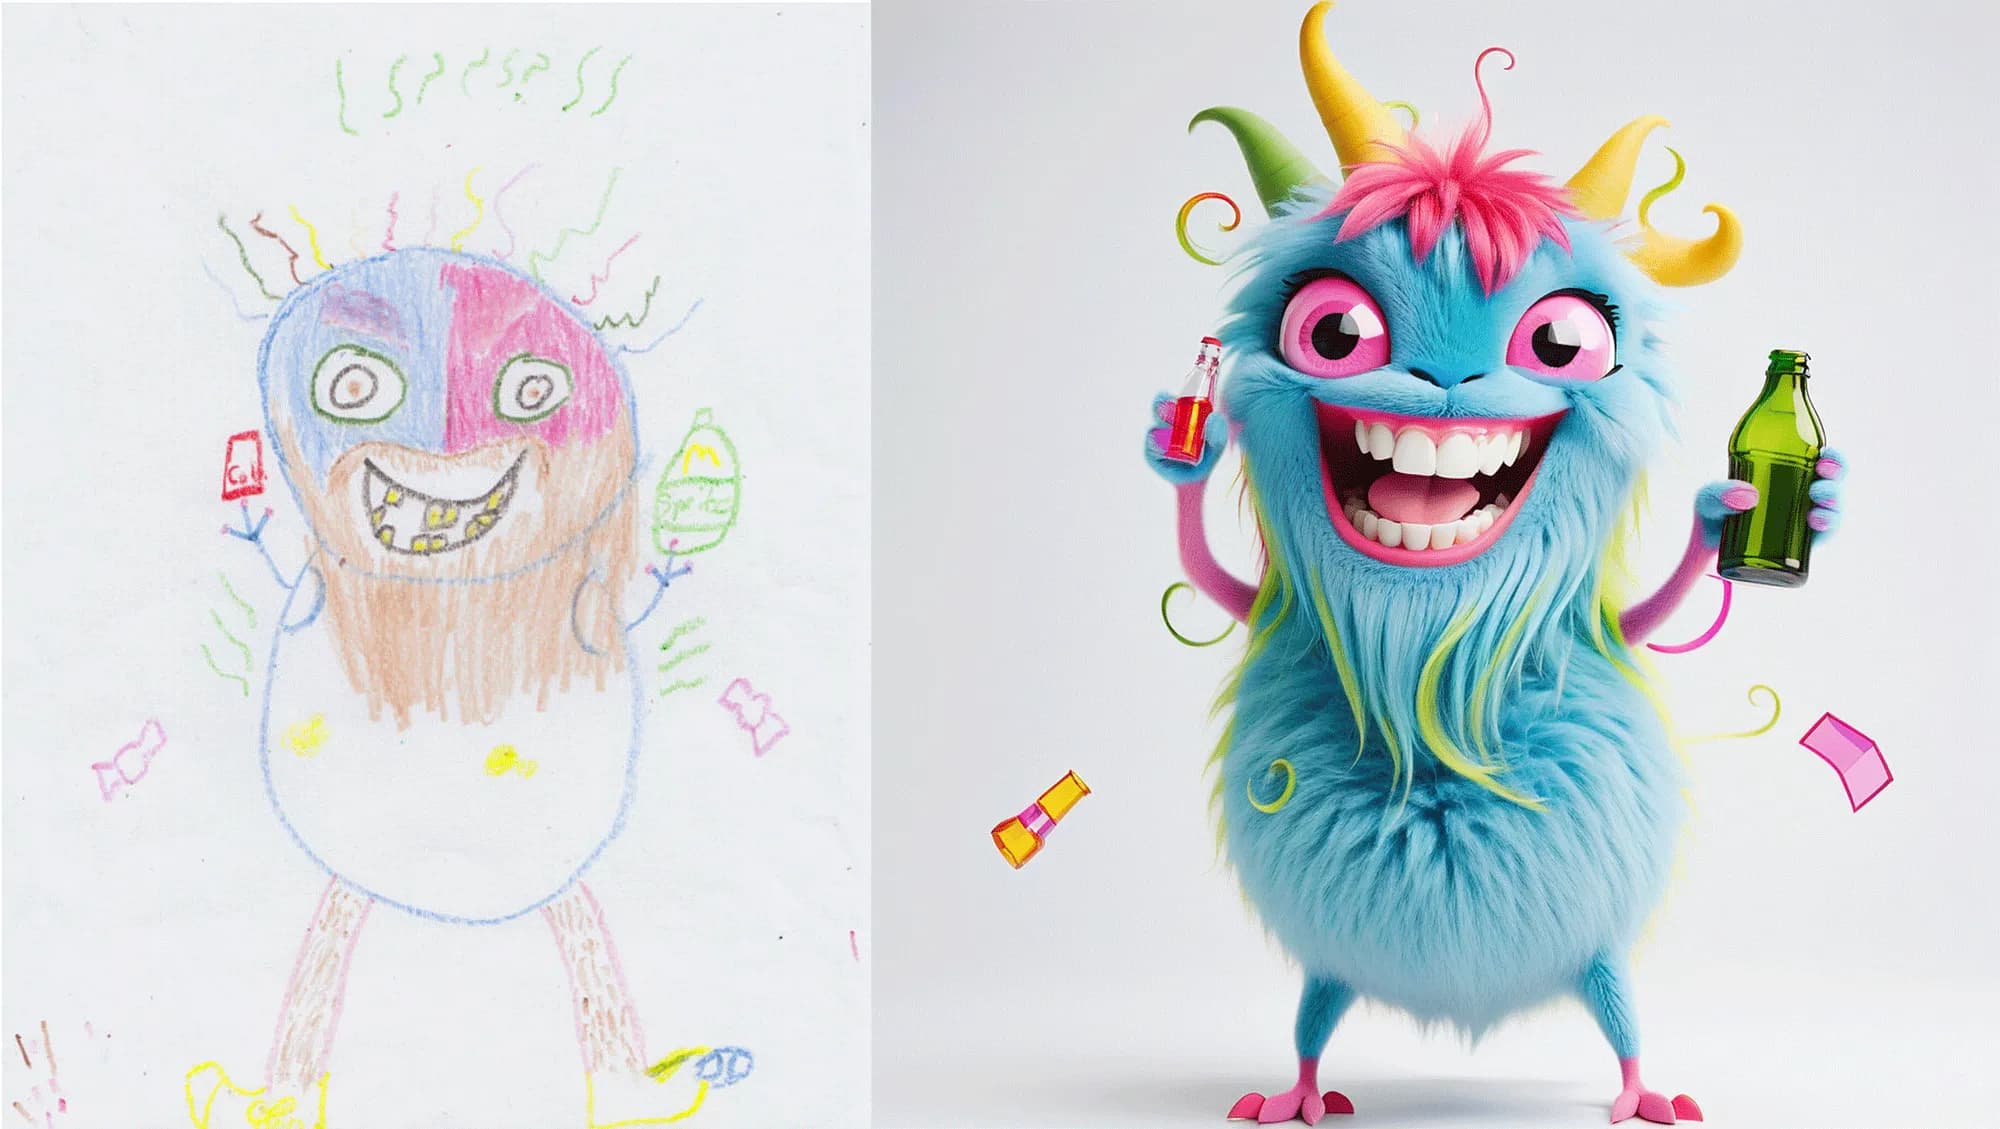
Some drawing are also very difficult to interpret and in this way it might be worthwhile if the user gets to express what they are looking to achieve.
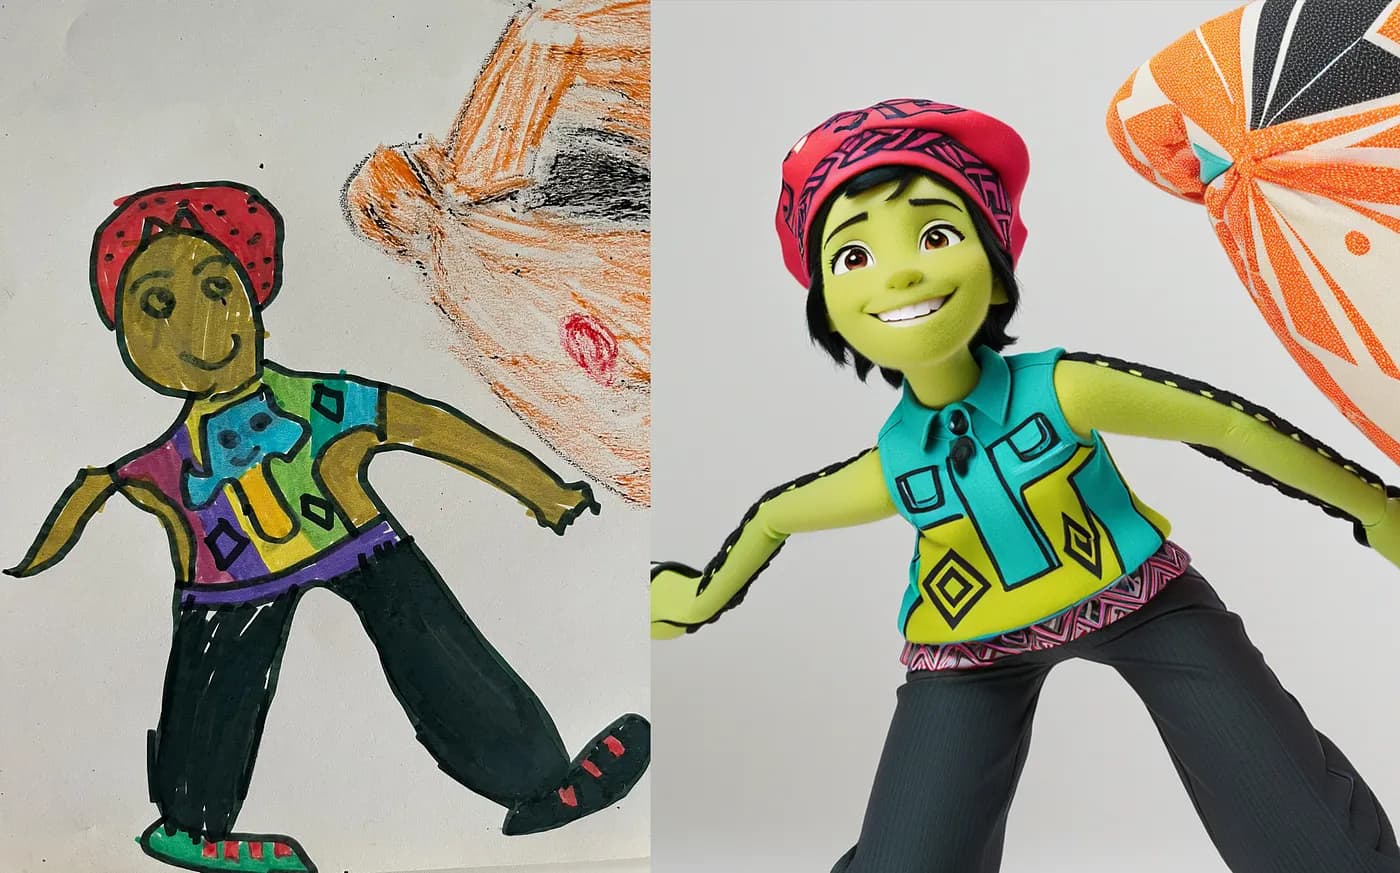
You can see an actual drawing to an image above where a child was expecting something else but the image process tried to adhere to the original. In this case, having the child give notes to the vision model on what the she or he wants from it may not be a bad idea.
Notes
If you’re testing this through the web app, there are a few things to keep in mind. One, you’ll need to either upload an image or pick one of the AI-generated examples to start with.
Two, the prompt controls what you want to do with the image — it comes with the default text I used for my workflow, which you’ll ideally want to keep unless you’re intentionally going for something different. Three, in the Advanced Options, you can tweak the strengths of the ControlNet, IP Adapter, and LoRA to see how they affect the output.
If you are working with a hard to interpret image and the results aren’t adhering to the original, try increasing both the ControlNet and the IPAdapter. If the generated image is not adhering to the prompt then try to decrease the strength of the IPAdapter.
Just remember: if the IP Adapter weight is too high, it can overpower the prompt. Too much ControlNet strength, on the other hand, can reduce creativity. If you run into API errors, try again and make sure the generation has fully finished before refreshing.
You’ll find the finished workflow here, which you can load directly into ComfyUI. Then you can use this web interface to start generating images.
If you are lost and find that you need a review, go read my introduction piece on advanced AI Images and ComfyUI here.
If you liked the piece share it.
❤